|
|
xplorer²Exponential growth to file management productivity |

|
|
xplorer²Exponential growth to file management productivity |
Basic program options tweak how UI elements like the active folder view and the tree behave, whether you want dark mode interface and such. Using layouts you can define different workspaces, sets of panes and their positions and sizes to suit different file management tasks.
Under Customize main menu you will find several categories of favorite lists, that are maintained in a uniform fashion (Add/Organize/Execute as we saw for bookmarks), and in particular:
Each of these lists can hold up to 100 saved items, if you need more you must first delete some of the old unused entries. The same limit applies to saved hyperfilters. If you want to see more items in Customize submenus, saving you the trouble of using More... menu commands, increase "Custom menu items" advanced option. Then you will have direct access to more favorite customizations.
If you add any of these special favorite commands on a toolbar, right click on the button and pick Properties menu command. This gives you a shortcut access to the list's Organize menu, where you can change the item's properties. For example you can edit the commands of a macro this way.

Bookmarks and other items listed under Customize menu can be assigned custom keyboard shortcuts (in the range 0-9) using dialogs similar to figure 8. To change the keyboard shortcuts of all other menu commands use Customize > Keyboard command. This way you can assign e.g. <F5> to be used for folder refresh and so on.
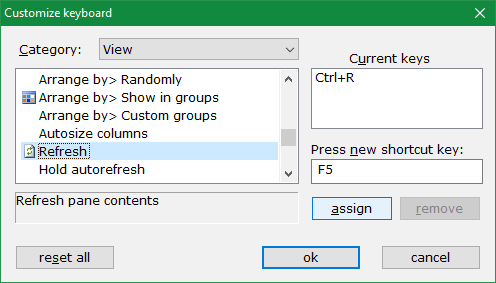
The dialog lists commands organized by the main menu bar (File, Goto, ...) . Use the Category drop down list to select the menu that holds the command you want to remap, e.g. for Refresh we need View menu. Scroll down to find the command you want and click on it. You will see its current keyboard shortcuts in Current keys box. To set a new key, click in Press new shortcut key box and type the key e.g. <F5>.
Click assign button to set the new combination, it will be then listed in Current keys box. If you want to remove the old accelerator, select it and click remove button. To reset all key mappings to "factory defaults" click reset all button.
Change as many commands as you want, and click ok to finalize the new key bindings. All menus will be updated to show the new keyboard shortcut next to the command name. You only need to change command key bindings once, and next time you restart xplorer² it will remember your favorite keys.
Customize > Keyboard use menu command lists the current key assignments for all xplorer² commands. You can copy out the text, paste it to an editor and print them out so that you remember the quickest way to reach your favorite commands.
Any command from the menu system that shows an icon next to it can be placed on a toolbar. You know which commands you need to use more, so you can place them on a toolbar for easy access. Also you can remove toolbar buttons that you don't use that match and replace them with others you enjoy more.
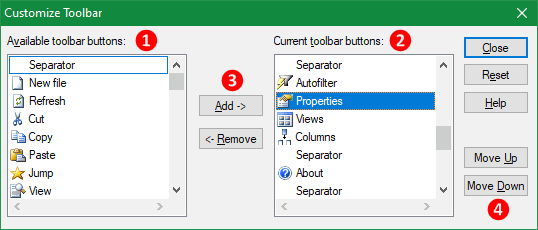
The dialog shows all buttons that are Available [1] (all menu commands with icons), and a list of buttons Current [2] on the toolbar. Select any command from the Available list and click on Add [3] button to add it to your toolbar; likewise select a button from Current list and click Remove to get rid of it.
Finding a command to add can be a bit of an ordeal, as there is no way to search for commands, you just scroll the list till you see the icon you are after. Toolbar button names may or may not be similar to their respective menu commands, sorry about that! As for commands in Customize menu (macros, user commands, bookmarks etc), you can identify them by their list name.
The current list shows items in the order they appear on your toolbar. Select an existing command and move it up/down with the buttons [4]. When you add a new button, it gets inserted before whichever item in the current list you have selected. If the new button ends up somewhere you don't like, use move up/down to relocate it.
When you are done customizing buttons, click Close button to see your new toolbar. Or if you changed your mind, click Reset button to undo your recent changes.
Use Customize > Toolbars > Add new menu to add a new toolbar with a name, and get to customize it immediately, adding buttons for a particular task. You can have up to 10 such extra toolbars. It makes sense to organize extra toolbars in a task-oriented fashion, bunching relevant buttons together. Whenever the need arises you activate the toolbar using View > Toolbars menu (or right click on any toolbar). You don't have to keep all toolbars visible at all times. Toolbar visibility is one of the properties associated with layouts — each layout can have its own set of active toolbars.
For a quick face-lift of xplorer² appearance, you can download and install custom toolbar and menu item images that other xplorer² users have created and shared with the community. To see what's available click here.
You can also create your own skin. It's easy and no programming is required. Just grab the original button images and modify to taste with any image editor, then drop them in the installation folder. You may also consider sharing them with the rest of the world - just drop us an email.
Download skin designer pack (17 KB)
Nowadays you need two skins, for the 2 available toolbar icon sizes. One should have buttons 16-20 pixels square (x2skin.png), and the other should be any size you like up to 48x48 to match your screen's DPI (x2skin_XL.png)
You can put any of xplorer² menu commands in this submenu, whatever you need to have handy as a context menu command. Use xplorer² > Organize command to add and remove items from this special menu:
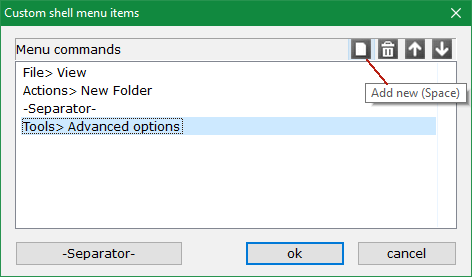

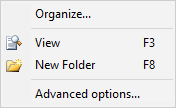
Use the little toolbar to add, remove and reorder existing menu commands. When you click Add new you get a dialog similar to keyboard customization, where you can select a menu command by category as they appear on the main menu bar. You can add separators too for grouping commands. When you are all done click ok button to finalize the menu; commands will appear nicely with icons and keyboard shortcut information, see the above picture.
This submenu is inserted in the context menu of all items, active folder, folder tree, even the background menu where you click "nowhere". If you don't want to clutter your shell context menu with extra commands, you can remove xplorer² menu using the advanced option "Don't add xplorer² commands in shell context menu".
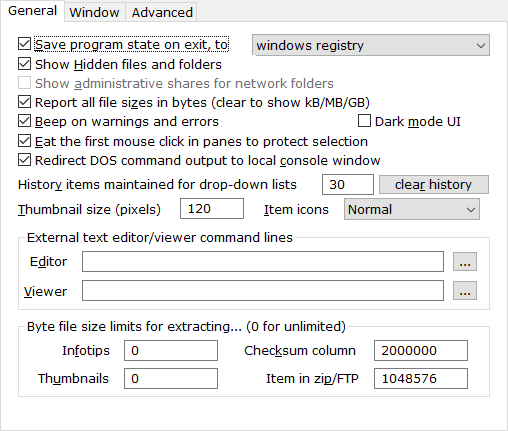
The main options dialog organizes the available settings in reasonable categories, using the property tree [1]. As you click the tree branches, the respective properties are loaded in the list [2]. The active tree category is shown in bold. The property list is a custom control that may be unfamiliar to some people, so please watch the demo video for the basics of its operation.
The list is split in 2 columns, the left shows the property name, and the right its current value setting. You can resize these columns with the vertical separator line — but this is usually not necessary. The information box [3] explains what the selected property does in brief.
Click on a property name to select it, or use the up/down arrow keys to move in the list. Most properties are simple yes/no types (similar to checkboxes) that you flip on/off using the mouse or <SPACE> key. When a property is set to Yes it is enabled:  . Other options are drop-down lists where you select one of the available options, for some you type in a number or path, and a few more complex types launch an external dialog (e.g. for font or color selection). Use the button ... on the rightmost of the property row to activate such extended properties (or press <F2> key)
The way you change the selected property depends on its type. If you are expected to type some text, you can start typing immediately, then press <ENTER> key to set it. Press <TAB> or <F2> to select from a drop-down list, or use the drop-down arrow with the mouse. To jump to the category tree press <SHIFT+TAB> keys. If the selected property doesn't expect text, typing a few letters will either find the next matching property by name, or jump to the property search box [4] automatically.
Use one or more keywords in the search box [4] to find matching properties, regardless where they reside in the category tree. As you type more keywords, you find fewer options with increased precision. Note that all keywords you type are searched for, but if nothing is found, the search automatically switches to any keyword mode, where a single keyword match is enough. Text in property description and values is also searchable. You can change properties in the search results list directly. To see all properties, clear the filter text with [X] button.
After you change one or more options click on ok button to close the options dialog and apply your preferences, or cancel to retain your old options. Some options like font changes necessitate opening a new window — this is done automatically with minimal interruption to your workflow..
Hopefully you will find most options self-explanatory by their extended information in box [3]. Let us go quickly though the available categories.
Changes you make to global properties like bookmarks and items in Customize menu are always saved on exit, regardless of this option (unless you tick the advanced option "Don't save global options either"). If you have it disabled, use Actions > Save settings now menu command whenever you want to save a snapshot of your latest settings.
|
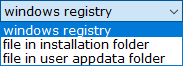
xplorer² professional saves settings only in the windows registry. This is the recommended location even for ultimate edition, when you have it installed in your home/base computer (registry is much faster than INI files). If you want to run ultimate edition in portable mode, pick "File in installation folder" from the drop-down list as the destination for saved settings. This will create an INI file in the flash drive, next to the program.
|
|
|
|
Click on Appearance tree category branch to tweak these options:
|

|
|

|
Click on Sorting tree category branch to tweak these options that deal with arranging items
|

|
Click on View panes tree category branch to tweak these options for folder view panes:
|

|
Click on Folder tree category branch to tweak these options for folder tree pane:
|

|
Click on Preview tree category branch to tweak these options for quick viewer pane:
|

|
|

|

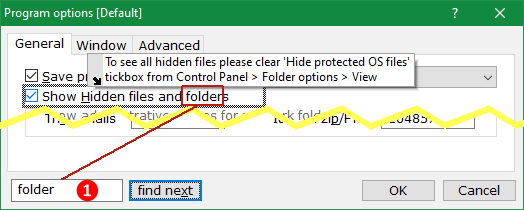
Advanced options are split in two categories, global and layout-specific, and are selectable using the tab control [1]. Global options affect all layouts, and layout options are just for a single layout. Use the layout selector drop-down list [2] to choose which layout you want to change.
The layout selector is set to the xplorer² layout that was active when you started the external settings tool
There are too many options to describe in detail, the most important ones were mentioned in the body of this document, so you can search for them by name using the search box [4]. Or use a generic keyword like thumb and click Find next button a few times to see what tweaks are available related to thumbnails.
The main body is the property control that lists all tweakable program options, and lets you change them. There are numeric, text, color and other types of properties. As you select properties, you get to read brief explanations about what each one does in box [3].
After you are done changing options, click on ok button to save them and then restart your xplorer² to see them in action.
|
You spend time and effort to tweak xplorer² settings to your liking, so you want to safeguard them against the numerous setbacks that are unavoidable with computing. Hence you should make a backup of your settings every once in a while, and keep them safe in case you need to restore them.
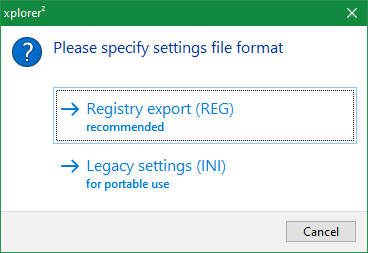
xplorer² saves its settings in the registry (or INI file if you run ultimate edition in portable mode). Use Actions > Export settings menu to save your current settings to a standard registry information REG file. Ultimate edition gives you an option to create an INI settings file, see the question to the right. All settings are exported, window sizes, dockable panes, fonts, tabs, layout information etc. Keep this x2settings.REG file (or however you chose to call it) somewhere safe, perhaps in your backup disk drive. If a case arises where you need to restore settings, one possibility is to fully quit xplorer² with File > Exit menu, then double click on the previously exported x2settings.REG file which will be automatically imported. When you restart xplorer² it will look like it did when you created the settings snapshot. Another way is to do Actions > Import settings inside xplorer².
You must browse the REG file you want to import and select it before using the import menu command. You are effectively using xplorer² as a giant Open dialog. For ultimate version, ensure your current settings persistence option matches what you are trying to import (must be registry for REG and file for INI import).
|
|
Another use for backed-up settings is for troubleshooting problems. After series of tweaks you may find your xplorer² is in a rut and won't work properly. An extreme attempt to bring order is to fully uninstall then reinstall xplorer² with its "factory" settings. Export your settings before such drastic measures so you can restore them — but chances are the problem will return.
HKCU\SOFTWARE\ZabaraKatranemia Plc\xplorer2_UC
HKCU\SOFTWARE\ZabaraKatranemia Plc\xplorer2_UC.global
HKCU\SOFTWARE\ZabaraKatranemia Plc\xplorer2_UC.customLayout
... (other layouts)
Finally if you want to move xplorer² to a new PC, export its settings from the old one (before uninstalling), then import them to the new PC. Not all settings are transferrable, e.g. bookmarks and user commands with full paths expect a similar folder hierarchy organization — which may be absent (even small path differences make bookmarks unreachable).
A layout keeps information about the entire xplorer² window and in particular:

The bottom half of Window menu is a list organizing saved layouts, like we have seen many times in Customize menu and bookmarks. Use Window > Organize to assign icons and shortcut keys to saved layouts — note you cannot rename or reorder them like other favorite lists but other than that the list management is similar, e.g you can delete unwanted layouts.
Some people use layouts to organize different sets of folder tabs, but that's not the recommended use case. If the only thing you need is to switch folder tabs, you can use folder groups (or super dual bookmarks for dual pane with tabs), perhaps combined with a custom desktop shortcut to launch xplorer² with these particular folder groups using arguments. At any rate each layout starts with a fixed set of folders every time (unless you ticked "Disable per-tab setting policy..." advanced option).
When you start xplorer², it comes up in whichever layout you used last time. If you want to start with a different layout, use "/S:layout name" command line argument (/S:default will force the default layout). However it is recommended you make your basic modifications to the default layout so you don't need to invoke another one as your default.
|

|