|
|
xplorer²Exponential growth to file management productivity |

|
|
xplorer²Exponential growth to file management productivity |
In spite of the drag-drop and click-happy era of file management we're living in, for some tasks you can't beat the efficiency offered by traditional command line execution of programs. In the old days, instead of clicking on icons to start a program, one had to type its path/name in a command processor window (DOS console). This may seem quaint and antiquated but it is very powerful since you can specify extra arguments that modify the behaviour of the program in question, specify which files to operate upon etc.
xplorer² brings the command line into the third millennium, easing its use while maintaining all its power and flexibility. If you are familiar with the DOS console, you can regard the active pane cum addressbar combination as a graphical console that shows the folder contents of the "current directory" at all times. As you browse folders the "current directory" is updated automatically, and the commands you type can access the folder contents directly.
You can start composing text commands using Tools > DOS command menu, or just get into the addressbar with <Shift+Tab> and type the special prompt $ character that instructs xplorer² to interpret the input as a DOS command — otherwise it could be mistaken for a folder path. For instance typing $ dir and pressing <Return> will execute the DOS dir command, producing the listing of the current folder's contents - arguably not the most useful command within xplorer²'s context!
DOS commands create usually text output that goes into a DOS console window. xplorer² uses its own user friendly console window, but you can also use the traditional MSDOS console.
Except for DOS commands ($-prompted) you can also execute generic windows programs using the special character >, e.g. typing > winword will launch MS Word. In this sense you have all the functionality of the standard Start > Run menu straight from the addressbar. This execution mode is mostly for programs that have their own user interface and don't need a console window for their output.
Except for launching both DOS and windows commands, the addressbar assists you during the typing process in a number of ways:
Commands launched from the addressbar normally apply only to the single focused item in the active folder view. If you want to apply the command to all selected items use a double prompt character, e.g. >> or $$. Then instead of running the command once, it will be repeated for each selected item. This construct is a simple road to scripts without a dialog window.
Instead of typing specific filenames as parts of a command, you can use special characters that get automatically substituted with the name of the item(s) that happen to be selected when a command is executed. For example the commands $type file1 and $type $N are equivalent if file1 is the focused item in the active folder pane. Using special tokens like $N saves keystrokes and allows for reusable commands. So whereas $type file1 can only be used to type (show the contents of) file1, the version with $N can be used to type any file, as long as it is selected in the active view.
There is a variety of $-tokens, each representing a different part of the active item or even the all selected items taken as a whole. Let's use a hypothetical situation to clarify the meaning of each $-token. Suppose we have a dual-pane arrangement where the right view is active and the contents are:
The following table lists all the available tokens. The third column shows what each token would have been substituted for, given the above scenario. Unless stated otherwise all tokens act on the single focused (or active) item in each pane.
|
Many of these tokens are intended for renaming large numbers of files, as they are used in File > Mass rename command. But you can use them for any other purpose too; just type as many tokens as necessary in a single command and they will all be substituted according to the above rules.
Now we are in a position to explain the celebrated windiff command used to compare the focused item in the active pane to its namesake in the inactive pane:
>WINDIFF "$N" "$I"
Consulting table 3 above, $N corresponds to the focused item, its full name without path, and $I is the path of the inactive pane (without explicit filename). Note we enclosed tokens in quotation marks to guard against spaces in paths and filenames. This generic command template can be used to compare whichever file is active — and regardless which pane is active (left or right).
You may have noticed that all tokens in table 3 were listed in uppercase. If you type a token in lowercase then it is interpreted in a slightly different fashion, using the short 8.3 version of whatever name the normal uppercase token would have produced. To clarify, had $N corresponded to undocumented.h the lowercase $n would have resulted in UNDOCU~1.H, which is the equivalent old DOS filename.
Another kind of token can be used to extract the text of a particular file column. The generic format is ${column_name}, e.g. ${size} will fill in the file size as it appears in detailed view mode. You can use any of the available columns, which comes handy for mass renaming as e.g. you can use MP3 tags as part of the filename.
For date property tokens you can supply your own format specifier, overriding the way dates appear in columns. This is most useful when friendly dates are in force. You can supply a custom date format as ${Modified:yyMMdd HH:mm} where date and time format pictures come after the property name, separated by a colon :
The colon modifier has an application for counter tokens too, signifying a step size. So whereas plain $01 generates the sequence 01,02... the modified version $01:3 would generate the sequence 01,04,07... (numbers increasing by 3).

Most DOS commands don't have a GUI of their own and rely on the console window for their output. This is the traditional black & white system DOS box, which is rather awkward to use. xplorer² comes with a substitute console that is nearly equivalent in functionality and much easier to work with, e.g. it can mark and copy text like a normal editor window, search for text, etc.

This modern version of the DOS console automatically follows the browser window, changing its current directory as you browse folders with xplorer². The working path is shown on its title bar. It receives the output of all $-prompted commands issued from the addressbar and from command scripts, too.
The top row toolbar lets you easily copy/paste and even search for text in the console output. You can also select the font to use.
You can also type commands directly in the console window - that's the purpose of the input field ("addressbar") shown in figure 45, as well as deliver input to running programs (e.g. Y/N responses). This input area supports path autocompletion with <F1> key and maintains a history of past commands too.
If despite all the extra functionality you prefer the traditional DOS console, you can disable it unticking "DOS console" program option. Note that in such a case you'll get a separate console for each DOS command you execute.
Commands launched from the addressbar operate only on the single focused item within the folder being browsed (unless a double prompt as >> is typed as discussed above). In some occasions you may need to apply the same command to a number of files as for instance for batch conversions of MP3 files. For this task it is more convenient to use Tools > Command script menu to treat all selected files in one stroke.
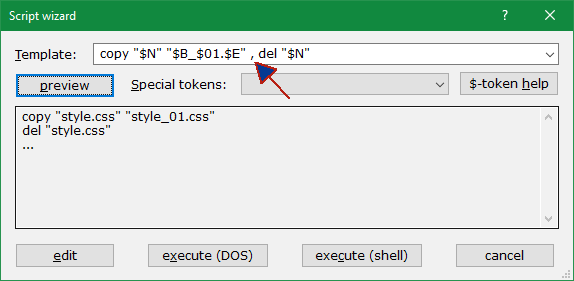
In this dialog you specify a command Template that will be applied to each and every selected file name. The syntax is identical to the addressbar commands, using the familiar $-tokens instead of actual file names. Command templates may contain multiple comma-separated commands as the above snapshot illustrates. If you want to add a comma verbatim in a command escape it with two ,, commas.
If you don't remember the token names to use, you will find most of them under Special tokens drop down list. For extended information click $-token help button. As you compose your command template use the preview button to double check the command looks like what you intend it to! It will apply the template on the first selected filename and show the command(s) in the preview window. The example above inserts a counter at the end of the filename by a laborious route (copy then delete instead of a simple REN) — it was selected for demonstration rather than for its usefulness :)
The script generator replicates the command template for each selected file in succession. Plain text parts are reproduced verbatim and $-tokens are replaced on a per-file basis. If you have 100 files selected then 100 sets of commands will be generated, effortlessly. Let's have an example using the template ren "$N" "$B_$01$$.$E" on a selection that comprises 2 files, x2help.htm, x2help.ccs.
This template has four special $-tokens, N for the whole name, B for the base, E for the extension and an automatic counter starting from 1 with a leading zero ($01). The double dollar is an escape for a single $. For each file the generator copies the constant parts of the template including spaces and quotation marks, and substitutes the variable parts using the file in question. For our two files this translates to (notice the counter in the second line):
ren "x2help.htm" "x2help_01$.htm"
ren "x2help.ccs" "x2help_02$.css"
The commands are executed on each item in the order they appear in the active pane. Most of the time this isn't important unless you use automatic counter tokens; in this case make sure your selected items are sorted in the appropriate sequence before executing the script.
Once the script is generated, there are a number of alternative modes of execution, each activated by a dialog button:
You should note that the wizard is merely manipulating strings and is oblivious about their meaning or command syntax. If you make any mistakes you will notice during execution! Always preview the template before executing the commands.
powershell -command "& {(get-item '$F').LastWriteTime = get-date '${Picture date}'}"
This uses $-tokens to change the modified time of selected JPGs to the date the photo was taken!
For more customization use Customize > User commands > Organize menu, which will open a dialog like we have seen for organizing bookmarks. Edit the user command you just added to change the icon, add a keyboard shortcut for quick access and so on:
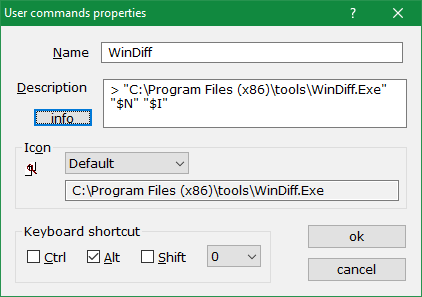
The Name is just a mnemonic for your own use, as it appears on the user command list. The important part is the Description which is the command line, including the program and the arguments. Notice you must start the command with the correct prompt character ($ for DOS and > for windows GUI tools). Click on Info button to see a reminder of available $-tokens.
Once you define a command, you can access it from Customize > User commands list. For easier access assign a keyboard shortcut to it, or add it on a toolbar through customization. User commands in toolbars are drop targets, meaning you can drag drop a file on a command button and it will open in the respective user command.
The order of command items determines their position in the respective submenu. Items in the top of the pile are easier to access so you should keep the most frequently used ones near the beginning (use organize command to reorder them). Each submenu shows up to 20 user commands; however you can define up to 100 items for each category and access them using the More... menu command.
Here are some examples of really useful external commands. The first uses the $A token to join multiple selected PDFs in a single file called OUT.PDF. The second can convert any video file to the MP4 format. Obviously you need to download the tools first and change the paths to match your installation.
|
When executed from the command line xplorer² accepts a number of optional arguments that control some aspects of the program. The complete command line is:
xplorer2.exe /F:n /P /R:rootFolder /S:registryKey /L:searchFromFolder /I:settings.REG /M /1 /2 leftFolder rightFolder
All arguments are optional and are described in the following table. The last two arguments — without the / switch character — specify starting left & right pane folders for the main window. These can also be the names of folder groups saved in Customize menu if you want to reinstate a particular set of tabs upon startup.
If you start with a scrap container (/F:1 switch) leftFolder can be a cida file or a name of a folder to flatten.
|
|
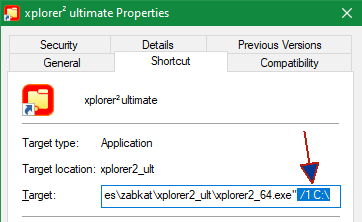
You can take advantage of these options by creating a desktop shortcut for xplorer² (or use the one added by the installer). Right click on the shortcut icon and pick Properties from the context menu. Switch to Shortcut property page, and add the required command line arguments in the Target field, past the executable name. You must leave a space between the executable and each option you add. The snapshot to the right illustrates a shortcut that launches the program using the options /1 C:\, which means start with a single pane and browse folder c:\ Likewise you can create multiple desktop shortcuts, each for a different starting folder or starting layout (passing the layout name with /S: switch). Rename these desktop shortcuts to recognize what each one does.
if the folder path you want to pass as an argument contains spaces, enclose it in "quotes". Likewise, if a layout name contains spaces, enclose the entire switch in quotes, as such:
xplorer2_64.exe "c:\some path\with spaces" "/s:layout name" |
|
|

|