|
|
xplorer²Exponential growth to file management productivity |

|
|
xplorer²Exponential growth to file management productivity |

You can create folders at will, move them around, copy and delete them. Likewise you can create, move, rename and delete files within any folder. There is only one rule: each item in a folder must have a unique name — but you can have identical names in different folders.
In the old days of DOS consoles (DIR command anyone?) folders had to be reached by typing their names. To browse a folder a few levels deep, you had to type the names of all intervening folders, the path you had to travel to reach your target folder. The full path is the address of each folder starting from the top (root) folder. As at each level names are guaranteed to be unique, the path can identify any folder unambiguously.
|
Paths use the backslash \ special character to separate folder names. The backslash is a reserved symbol that isn't allowed to be used in folder or file names. For example to address the subfolder in the pic to the right, we compose its path using all higher (parent) folder names, starting from root as such:
root\folder\sub1 Files also have path names, you just append the file name to its parent folder path name, using a backslash as a separator as usual. Thanks to GUI programs like xplorer² you no longer need to type folder paths manually, but you come across them all the time so it's good to know what they are. |
|
With xplorer² you seldom need to type folder path names manually. A large proportion of the program's infrastructure is there to help you get from A to B quickly and effortlessly with a variety of folder access mechanisms:
Normally you browse folders in the active pane but there are other possibilities, depending on keyboard modifiers:
You can also type file names (with or without a folder path), which is a quick way to browse a certain folder and select the named file item in one stroke. It also accepts simple wildcards that constrain item visibility. To save you typing it supports path autocompletion. If you tick "Path autocompletion" option it helps you complete path segments using a popup completion list.
![]()
The addressbar can be set to crumbs mode as in windows explorer, where individual path segments are clickable. Clicking a crumb takes you to its respective folder. The little arrows next to each crumb button open a menu with local subfolders available for browsing. If you are browsing a deep folder, only the last few path gegments that fit are shown; for accessing higher levels use the leftmost arrow button, which will show hidden segments all the way up to the root drive. Click on the leftmost folder icon to edit the path.
These crumbs are handy but take up too much space. Tick "Don't use fancy path crumbs..." advanced option to see the traditional addressbar with simple text paths. This plain addressbar isn't clickable; for this functionality use the pane's titlebar (see figure 6. Remember xplorer² introduced crumb browsing years before windows explorer copied the original feature.
The combo box drop-down portion includes a recent history of your browsed folders, saved bookmarks and your most frequently used paths. You don't need to click on the rightmost arrow extend the drop-down history, just type part of the path you are after and hit <Up-Arrow> key to fetch the first matching path; if that isn't the one you are after, press <Up-Arrow> again a few times, to see all completions. For example, typing fresh would match a history folder named C:\TEMP\FRESHMAN. You can also type saved bookmark names.
You can also start external programs and pass files in the active pane as command line arguments. Type a > prompt character followed by a program name to run it. For example type:
> NOTEPAD $N
and press <ENTER> to start notepad and edit the currently focused file in the active pane!
$N represents the selected filename and is one of the available tokens that let you build a reusable command palette.
Another class of filesystem folders are remote or network folders, which give you access to hard disks of other computers via LAN or other connection. Instead of a drive letter, network roots are identified by a PC name and a root share folder, with two leading backslashes:
\\PCname\share\subfolder
Network folders are much slower and xplorer² takes special precautions when dealing with them. Other remote access folders are cloud drives like OneDrive, DropBox etc, but they also behave like regular folders most of the time — except for cloud-only files that are available on demand. xplorer² is careful not to cause unnecessary downloads for such cloud content.
Despite these local/remote differences, all these folders are regular filesystem, and you manage them in a similar fashion. All xplorer² menu commands work in filesystem folders.
Another folder class are in reality files, compressed archives like ZIP and RAR. They contain a local filesystem of files and subfolders, that's why windows shell treats them as "folders". Only a subset of commands apply to zipfolders. They are also slower than normal folders, as their contents need to decompress for many operations. As they contain files, xplorer² tries to offer a near-filesystem experience in terms of browsing and previewing.
xplorer² can also browse mobile phones (cells) and cameras and extract your photos, videos and other files. When you connect your phone via USB cable, it will appear as a special folder in ThisPC and you can browse into it. Such devices aren't read as normal filesystem folders, they are based on MTP protocol, and are quite slow to access. You are better off removing the SD card from your phone and using a card reader to get your photos faster.
Finally there are virtual folders, shell constructs that merely organize real folders, like ThisPC that contains all local and connected hard disks, Recycle Bin that manages files deleted and a few more special folders. You don't do much file management inside such folders, and each has its own peculiarities. Menu commands that are not relevant in special folders are disabled.
|
File type is also associated to an icon, the user friendly way to tell file types apart. All text .TXT files have the same icon as in the pic to the right. These icons are the only way to tell the kind of files if you disabled extensions (ticked "Hide extensions for known file types" system folder option).
Whereas you are free to rename the base name portion of a filename to help you identify it, it is unwise to change its extension. This poor attempt at file type conversion will probably make the file unreadable. Only plain text files can have their extensions changed without risk. |
|
Shell also uses icon overlays, little modifiers of basic icons, to convey extra information about a specific file. For example version control systems like TSVN use overlays to indicate the modification status of files in a repository. Another common overlay is the little arrow icon that denotes a shortcut file, a special file type with .LNK extension that is a "pointer" to a real file located in another folder (like the program shortcuts ![]() on the desktop).
on the desktop).
|
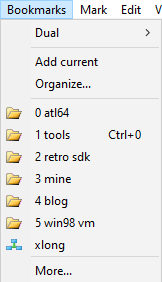
One way to organize bookmarks is the Bookmarks menu that looks like the pic to the right. It is a flat list of folders with a customizable icon and an optional keyboard shortcut for keyboard enthusiasts. You add folders to the list using Add current menu, which adds the current folder in the list with a name you choose. Then choose a folder from this menu list to browse it instantly.
As you add more folder bookmarks, this list will grow and cannot be seen in its entirety in the menu. Any extra bookmarks will be available from Bookmarks > More menu, which opens a dialog that shows all the saved folders (looks similar to figure 8 below), for easy picking. By default up to 25 bookmarks will show in the menu; to see more increase the "Custom menu items" advanced option, a setting that affects other similar menu lists (under Customize menu). Up to 99 bookmarks can be saved in this fashion. Bookmarks, like any menu items with icons, can be added to the main toolbar (item [7] in figure 1) for easier access. Right click on the toolbar and pick Customize from the context menu to add one or more bookmarks. Watch this demo video for more details. Bookmark names can also be typed in the addressbar and also autocompleted by partial name and <Up-Arrow> key. A bookmark stores just one folder that is loaded in the active pane. Bookmarks > Dual submenu manages a similar list of paired bookmarks. If you are in dual pane mode, Bookmarks > Dual > Add current will store both left and right folders as a pair; when you reinstate such a pair it will bring up two folders instead of just one. Another menu list caters for sets of tabs: Customize > Folder groups submenu will save all the tabs in the active pane as a single item. If you pick a saved folder group from the menu, all the folder tabs will be recreated in one stroke. All these menu lists are managed in the same way.
You can combine dual bookmarks with folder groups. When you add a new dual bookmark, you get to choose whether you want to save a pair of folders, or entire tab sets shown left and right. These super dual bookmarks will restore the entire workspace of browsed folders. You may find this handier than defining Layouts just for browsing certain folder sets in dual pane mode.
As you traverse the menu items of any customized list, you get to see the "description" of each item on the statusbar, so you can e.g. see the path that each bookmark menu item represents:
|
|
Bookmarks > Organize menu command lets you manage the menu list. Organize dialog shows all the stored bookmarks, including any that are not seen in the menu (if there are too many). This dialog allows you to reorder items (put frequently used bookmarks further up in the list), change properties and delete bookmarks that are no longer necessary.
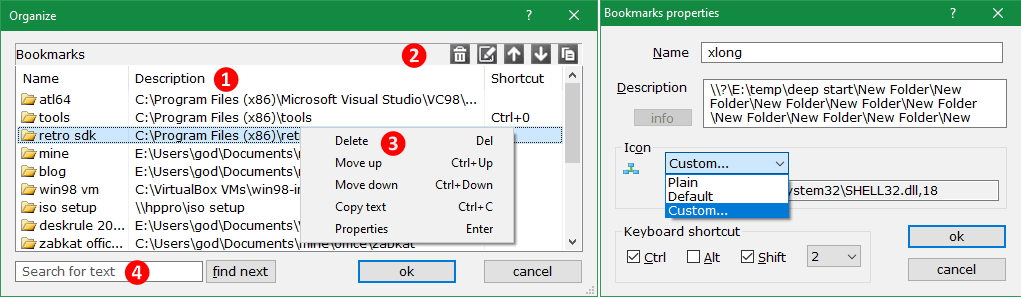
The organize list shows bookmark details [1]: the name, "description" (this is the actual folder path), and any shortcut key associated to the bookmark for easy invocation by keyboard. To operate on the list use the little toolbar [2] (use the button popup tooltips to see what each one does) or equivalently right click on an item to modify it using the context menu [3]. Use the search box [4] to find a bookmark by name. This box matches strings in both name and description columns. Click Find next to find the bookmark; if that wasn't the one you wanted, click Find next again for the next match.
Double click on an item to modify its properties; a secondary dialog will open that lets you change the Name, Path, select a custom icon and assign accelerator keys (they must be a combination of <CTRL> and <SHIFT> with a number 0-9. Don't use <ALT> because it will make the bookmark load the folder in the inactive pane.
The default bookmark icon is that of the bookmarked folder — that most of the time looks the same. Use Custom from the drop-down list to choose a completely different icon, that helps you find the bookmark easier (especially if you add it to a toolbar). The Plain icon option assigns a plain but fast folder icon, which is advisable for slow network folders. When you are done changing properties, click OK to confirm or cancel to discard any changes.
Managing and using bookmarks from a menu is not the most efficient way to go around browsing favorite folders. You can also use the tree's quick access list and the mini scrap pane to drag-drop folders, then click on them to browse them.
There is also the legacy quick bookmark in Go to menu, intended for temporary bookmarking. You set it on the current folder browsed using Set quick-mark menu, then you can quickly return to the same folder using Quick bookmark menu or by <CTRL+F1> keys. There are tons of alternative ways to browse a favorite folder in xplorer² — add this extra one in the bargain :)
Usually when you browse into a subfolder, the current tab switches entirely to it. Say you were browsing C:\path\DESKRULE and then you entered the subfolder C:\path\DESKRULE\INSTALLER, you'd expect to see the contents of INSTALLER folder replacing the old pane contents. If you turn on Miller browsing (File > Column mode menu) then both the original and the subfolder contents will show side by side. If you enter a new sub-sub folder e.g. C:\path\DESKRULE\INSTALLER\APPX then a third side panel will open, and so on. As you browse deeper, panes to the left shrink in width. If you have too many folders simultaneously open, a scroll bar will appear to help you manage the panes, since only a few of them will show at a time.
Miller browsing will strike Windows users as odd, but it is popular with Mac computers and their Finder file manager. Its advantage is that you can see neighboring folders simultaneously and transfer files from one to the other. Like dual pane browsing, only increased to multiple panes!
You move from one miller pane to the next either with left/right arrow keys, or clicking with the mouse. Only one folder is active in a miller column set, which will show in white background; all the other folders show with a darker background. The active folder is dominant: its path shows as the tab's current path, and all menu commands will operate in files selected in the active pane, just as if it was the only folder showing. After you create miller panels, each one could be set independently (e.g. one in thumbnails, the other in details, and a 3rd in list mode. But usually they all share the same view mode.
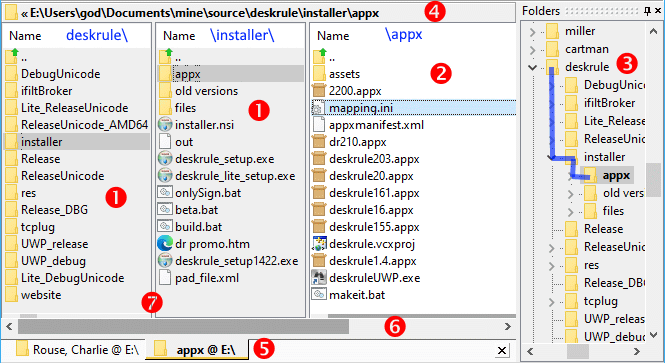
Let's go through the elements of a tab showing side-by-side folders, showing this mini-hierarchy:
DESKRULE
INSTALLER
APPX
When you open a new miller pane, the old pane shrinks down in width. By how much? If the pane is in detailed view mode, then it will be shrunk to the width of the NAME column. If it is in list or thumbnail mode, then it will shrink to the size of the currently selected folder item. You can set a maximum width limit to miller columns from program options setting a value for "Max list width". There are more tweaks available using Tools > Advanced options editor, e.g. the maximum number of side panels (default is up to 6 parallel folders).
If you use the folder tree or any other UI element outside the miller container to browse into a folder "far away" (e.g. typing a path in the addressbar), then the current miller pane is reset to the new folder. But miller mode remains active, so if you browse subfolders of this new master folder, sideway panels will pop up. To turn off miller mode completely, use File > Column mode menu or click on the equivalent toolbar/ribbon ![]() button. Also note that miller panes will not survive a program restart, only the last active folder will be re-loaded when you start xplorer² next time.
button. Also note that miller panes will not survive a program restart, only the last active folder will be re-loaded when you start xplorer² next time.
Another class of plugins that xplorer² understands are those of the popular Total Commander, another windows file manager. There are plugins for extended folder browsing (packer WCX), preview and thumbnails (WLX) and file attribute & text content (WDX) for file search. There are tons of such plugins available to download for free, so if you cannot find a windows standard shell extension for some exotic file type, you might be lucky with a total commander plugin. TC plugins must be installed with a plugin manager to be integrated with xplorer² — whereas standard shell extensions are discoverable immediately once you install them.
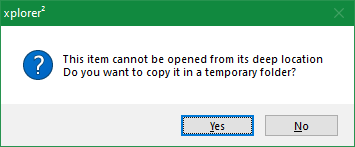
The low level NTFS filesystem does support long paths, up to 32767 characters long, and that should be enough even if you go crazy with long folder names — individual folders and file names are still limited to 260 letters. Super deep paths have a leading path descriptor that marks them as such (\\?\E:\temp\deep start\...). Unfortunately at windows shell level things are still retrograde. xplorer² is deep path aware, and can happily copy and manage files beyond the 260 letter limit, but most other windows programs cannot, and this goes for most programs that open your files. Put a word document in a deep path and you will find that MS Word cannot open it — so what's the point using deep paths? The best xplorer² can do is to copy the deep file into a temporary location so you can at least read it (but you cannot edit it!)
Under the circumstances you must avoid long folder names so you keep your documents at levels above (less than) the 260 character limit. If you insist on using deep paths, you can provide shell access using folder junctions, where you create a shortcut to a deep folder and place it high up in the hierarchy so that it looks "shallow" to deep path unaware programs.
There are familiar properties like file Name, Size and date modified, and more exotic ones like Owner and Comment. Common properties apply to all file types, but there are some that apply only to particular types, as dimensions for photos, duration for music etc. Properties that aren't applicable for a file type remain empty.
File properties are divided in 3 main categories that determine how they are compared:
Most people don't need millisecond time information for files and folders, and xplorer² can show user friendly dates instead of bland numbers. Sorting by date uses the precise file dates, but for display purposes something more palatable is shown, like yesterday or last month.
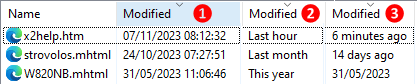
The figure above contrasts precise dates [1] with 2 different friendly date options available. Method [2] uses big chunks of time durations (the same date categories used in grouping), whereas extra-friendly file age [3] has better resolution, which is at least one-day accurate even for very old files.
If you prefer friendly dates, tick "Friendly dates" option; if you want file ages [3], you must also tick "Extra-friendly file dates..." advanced option — otherwise method [2] is used.
NOTE: the details pane always shows precise dates, even when friendly dates are enabled
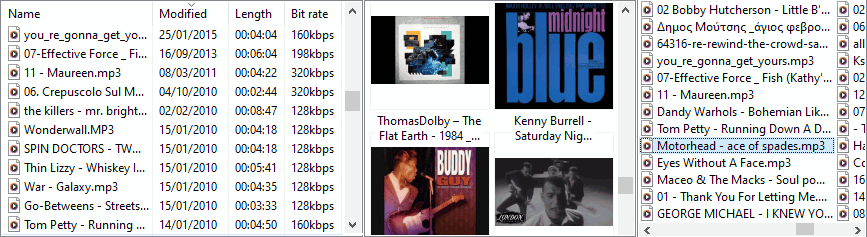
To see more files in a folder set the pane style to List. You can see common file details for the selected file on the statusbar — or turn on the details pane. This is more space efficient than seeing details for all files. If on the other hand you want to see less files with improved readability, consider increasing the "Line spacing" advanced option.
![]()
Click on the column header to arrange by the corresponding file detail, e.g. Name, Size, Comment or whatever else happens to show up as a file detail. Click on the same column again to reverse the sort direction from bigger to smaller and vice-versa. A little triangle shows the active sort mode (Name in the example above) and its ascending/descending direction. When you click on a date column, it defaults showing the most recent file first (descending), whereas text and numeric properties default to ascending order.
A folder usually contains both files and (sub)folders. By default xplorer² groups the folders separately, but you are free to choose another bundling scheme, using "Folders sorted" program option. You can have them separately at the top or bottom of the list, or mixed with files — using whatever sort method is in force.
Text properties like Name are compared strictly alphabetically, which means that 10 comes before 2. If you want your files sorted numerically (e.g. file1, file2, ... file10), tick "Natural number sort" option in program options.
|
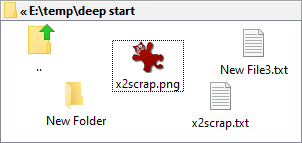
In smallish folders set in large icon or thumbnail mode, items can be arranged as icons on your desktop. Use View > Arrange by > Manually menu command to move items with the mouse and leave them where you like. One possible use is to create "piles" of items to denote their mutual relationship, or "put aside" some files for further processing (but color tags may be more appropriate for this task).
The item positions can be saved as part of other custom folder settings , so when you come back to this folder you'll find the items where you left them. Note you can sort (e.g. by Name or Date) a manually positioned folder if you need, temporarily destroying your custom positions, but once you switch back to manual arrangement, the positions will be restored. |
|
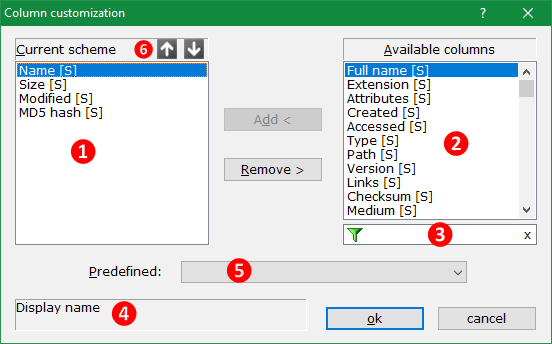
Current scheme box [1] lists the columns you have already chosen and show in the header. Click Remove button to remove the selected column from the current set. Columns available for selection box [2] lists all available properties, included e[X]tended properties provided by shell extensions. Select a property from the available box and double click on it (or click Add button) to add it in the current column set.
As there are hundreds of available properties, use the filter box [3] to search for a column by name, e.g. type date to see all date-related properties that can be used. [S]tock properties have a description as well, showing extra information on what they do in box [4].
Use the arrow buttons [6] to rearrange column order in the header. You can also rearrange columns by drag-drop (when the column selection dialog doesn't show). Grab a column with the mouse and drop it where you want it in the header row.
You can save a group of columns as a set using Customize > Column sets submenu. Define a set of columns then use Add submenu to save the set with a descriptive name. The list of column sets is managed in a way similar to bookmarks list. You can have one column set for (say) photos, one for music and so on, and quickly switch among them using Customize > Column sets list. The Predefined drop-down list [5] in the dialog above gives access to such saved column sets for use in the dialog.
Note: The same column customization dialog is used to select columns for infobars. There are a couple of special extra columns available for infobars, representing the selected items: one for total size (as on the statusbar) and one called Total duration that sums up the length of any media files selected.
|
Grouped view mode is an accented sort method where items are bunched up into categories, based on the major sort property. Many file properties support arrangement in groups, but not all do. A property must divide files into chunks of similarity — depending on the property type: text, number or date. For example Names can be grouped by starting letter, file sizes as small/medium/large, and dates as today, this week and long ago. Properties like MD5 hash on the other hand, which are unique for each file, cannot be used as categorizers — each file would be in its own distinct category. Any files that don't support the categorizing property end up in Unspecified group.
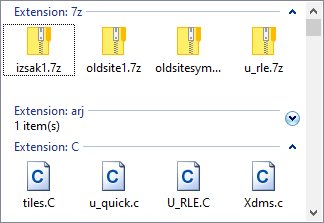
To see a folder categorized in groups, sort by a group-compatible property, then use View > Arrange by > Show in groups menu. The groups will appear as in the pic to the right, where we are sorting by Type (file extension). Each category is defined by a particular extension, and all matching files are grouped together. Each group has a title e.g. Extension: 7z, followed by a divider line. At the right end of this line there's a little arrow you can use to collapse a group, hiding its items (as the Extension: Arj group in the example). Click on the arrow again to re-expand a collapsed group. While showing groups, changing sort modes e.g. from Type to Date modified, will result in a different grouping appropriate for the new sort property. Normally items within each group are arranged alphabetically by name; to apply a different sort mode hold down <SHIFT> and click on the desired secondary sort property using the header row. To turn off groups altogether select View > Arrange by > Show in groups menu once more.
List view mode does not support grouping. The closest you can use that supports groups is small icons mode, but unfortunately this has many bugs and visual glitches for everyday use.
|
|
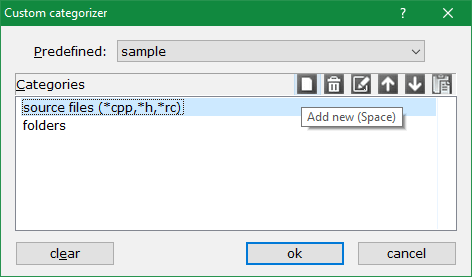
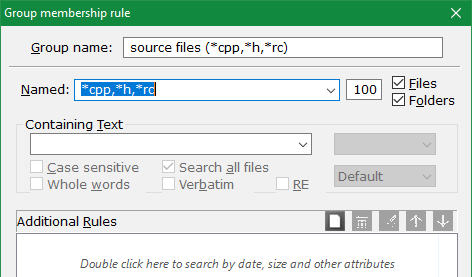
Using the small toolbar at the top-right corner (or the context menu) you can define, edit, reorder and delete custom categories using standard hyperfilters as they are used for file search. These may be as simple as a name wildcard, or a boolean combination of file properties. Each filter determines the group membership. Items are placed in the first matching category (in the order they appear in the dialog). Any items that cannot be categorized end up in the "unspecified" group.
The example in figure 12 will create (up to) 3 categories in each browsed folder, one will have files with CPP, H and RC extensions (it is wildcard based), the second will gather all folders, and all the remaining files will be in unspecified category.
Once you define a custom grouping you can save and reuse it using Customize > Custom groups menu. The group submenu list is managed in a similar fashion as bookmarks menu. Such saved groups are also available through the Predefined drop-down list in the above dialog.
If you want to stop arranging in groups (either simple or custom) uncheck the menu command View > Arrange by > Show in groups or click on the equivalent toolbar button.
xplorer² offers a sense of continuity as you browse your filesystem folders, maintaining your settings including view modes, sort orders, column widths, etc; it even remembers the item that was focused the last time you browsed a folder and brings it into view when (and if) you return.
In other words, xplorer² uses the current view settings for any pane as default. If for example you change from detailed view mode (View > Pane style menu) to list mode, then list mode will be default from then onwards for all folders browsed in that pane or tab.
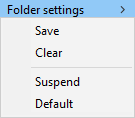
A different way to manage folder view settings is to setup a pane like you want it using various commands from View menu (e.g. pane style, number of columns, grouping, sort order) then declare this view mode as default using Actions > Folder settings > Default menu command. This way you tell xplorer² which default view mode to use for all folders. If you change any view parameters in some folder they will only last temporarily until you browse another folder, where the default settings will again return.
Note that folder settings can be different for each pane (left/right or up/down in dual pane mode), and even for each folder tab in a pane. You can have one pane in detailed view mode and the other in list mode. When you quit xplorer², only the active tabs save their settings; next time you start xplorer² all tabs will look like the two last active tabs. You can take advantage of this "trick" to make all tabs look the same by quitting and restarting the program. The menu command Go to > Same style makes the inactive (dual) pane identical to the active pane, including pane mode, file details (columns), sort order and any custom groups.
xplorer² does not change its view mode automatically to suit folder contents. You can force particular folders in a fixed view mode using Actions > Folder settings menu. So for instance you can have "My pictures" folder to appear always in thumbnails, even when you are browsing in a pane that is normally in detailed mode. When you get out of such customized folders the pane returns to its previous view mode. When you enter a folder with custom settings a status bar pane icon will appear as an indicator.
|
Under this concept, you setup a default pane style for most of your folders, e.g. details, and for the few exceptional folders you want to browse differently, save a custom view mode. When you first use Save menu to turn on a custom folder view, xplorer² asks you whether to apply the same mode to its subfolders — that may make sense if all subfolders have similar special content. Here is an easy way to do it:
|
|
|

|
