|
|
i-DeCloneAI-ntelligent detection and disposal of clones and near duplicate files |

|
|
i-DeCloneAI-ntelligent detection and disposal of clones and near duplicate files |
There is no shortage of desktop apps that seek and destroy duplicate files. i-DeClone packs a lot of power under a deceptively simple user interface. It uses Artificial Intelligence algorithms (SVMs) to discover not just identical clones but also near-duplicate files in various categories (Audio/Video/Photos/Documents/eBooks). Near-duplicates are files that may not be identical in byte-by-byte basis, but are useless duplications of information nevertheless, for example:
Cleaning up your hard disks from unnecessary duplication of information is a complex, time consuming and potentially dangerous operation. You don't want to end up deleting original or unique files. i-DeClone helps you manage this complex task in an easy to grasp and concise GUI, which both novice and computer-savvy users will appreciate. Here are the main ideas:
 signs)
i-DeClone has a sparse and focused user interface, for doing a single job: finding and cleaning up clones and similar files. It resembles a search results pane in windows explorer and similar file managers. This is the main program window showing some duplicate search results:
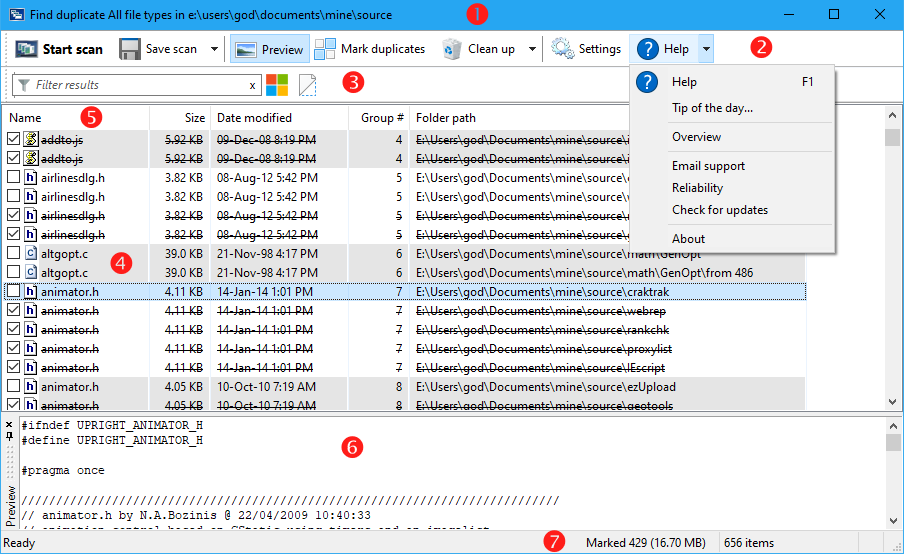
Here is a brief description of the main window elements:
| Some information and error messages are shown discreetly under the statusbar. These messages go away automatically after a few seconds. If you want to close them immediately just click on [X] button. |
 |
To focus your search effort, i-DeClone recognizes 5 specific file categories and one all-inclusive:
To start a new search click the big Start scan toolbar button. Ignore the project dialog for the time being and click on Start new project button.
|
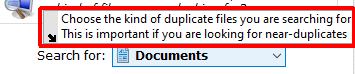
Quick help where is needed Scan setup dialog is rather complicated. i-DeClone shows balloon popups to help you remember what each option does. Just leave the mouse pointer over a checkbox or other dialog control and an explanation will popup as such: |
|
|

|
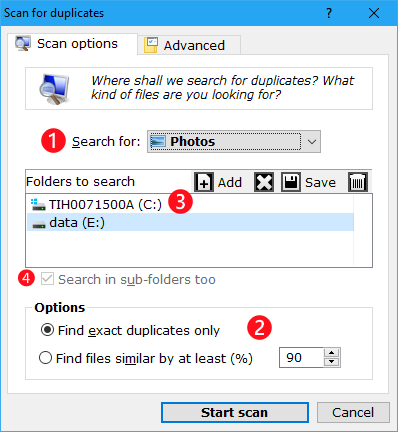
First choose the type of the search via Search for [1] drop-down list, e.g. select Photos to look for images of various sorts. Then decide whether you seek exact or similar duplicates, ticking the relevant radio button in Options [2]. For the time being let's stick to exact clones only. These two basic settings define the file properties i-DeClone will use to compare files to determine whether they are considered clones or not.
Then define the scope [3], that is which folders to search for duplicates. An easy way to add folders is to drag-drop them from windows explorer onto the folders to search box (<Ctrl+V> paste works too). Or use Add toolbar button to choose the folders to search using the standard windows folder picker. You can add just one or as many folders as make sense to your search. To remove a folder, first click on it then use [X] toolbar button or the <Del> key. This type of list and toolbar input method appears frequently in the user interface so it will pay to become familiar with it! For example Save button allows you to save and reuse lists of folders.
|
If you want to exclude some folders from being scanned, add them in box [3] as usual, and then right click on them and pick Exclude this folder from the menu. Excluded folder names appear in red letters. If you exclude a folder by mistake, use the same menu command to make it "normal" again. The example to the right will scan the entire F:\ drive except for F:\MUSIC and its subfolders.
Note that system or hidden folders are automatically excluded, so you don't need to use this method for those. |

|
Once you are all set, click Start scan button (or press <Enter> key) to start the scan for duplicate files. Use the project summary to double-check that all scan options are in order.
|
Discovering identical clones is relatively straightforward, there are 2 or more files somewhere in your hard disk with the same size and same content, possibly with same name as well. Things get trickier when we seek files that are "almost" the same but not byte-for-byte clones. For example the 3 photos to the right are not clones but one would consider them "the same thing". Do you want to keep all 3 or perhaps just one would do the trick?
Likewise you can have the same MP3 song encoded in 128 and 256kbps. One file is double in size but the song is the same. Perhaps you want to keep the smallest one, or the largest one if quality is your top concern, but surely there's no point keeping both? |

|
i-DeClone can find similar content by various degrees. Just type in the similarity level you seek in scan options dialog [2]. The similarity is measured in percent so 100% would find identical clones, whereas 25% would match many unrelated files as "approximately the same". You may have to experiment with different similarity levels here before you strike a good balance between accuracy and few false duplicates. Revising scans will come handy for fine tuning the similarity level.
i-DeClone calculates a similarity score for any 2 files combining all properties under consideration, either those default for the scan type (music, documents...) or those properties you added yourself. If 2 files are within tolerance for all properties, then they are considered similar and grouped together in the results. If any of the properties differ a lot, then they are dissimilar. As you lower the similarity limit in scan options dialog, more and more files will be considered "tolerably similar". This similarity score depends on the kind of property compared, as follows:
Most of the Artificial Intelligence embedded in i-DeClone is for figuring out approximate duplicates. Some quite elaborate algorithms are used, so changing the default comparison properties is not advisable (albeit possible). Different heuristics are used for each major scan category, for example for media files Length (duration) is used to tell which movies are probably the same, Date taken is the major property for photos and so on. You can review the default properties as you change the scan type in advanced page. The good thing is that you don't have to worry about all this complexity, we did all the thinking so you don't have to! :)
As you reduce the similarity threshold in scan options dialog, more and more documents (or photos) will be considered similar enough to be grouped together as "duplicates". Use the preview and comparison tools to assess the quality of the discovered groupings.
The similarity algorithm for photos uses the picture date as a guide. If you want to search for duplicates among generic images (not necessarily photos), untick Files must have same extension option in Advanced page (see next section). Then Average brightness will be used as the controlling property and may work better for PNG and BMP images for example.
The similarity algorithms used for Music and Video scans are more deterministic. i-DeClone actually "listens" to the music and "watches" the movies, extracting mathematical fingerprints that identify a song or video. To make things faster, only the first few seconds of the media file are used for calculating fingerprints; expect a 10% rate of false positives for 90% similarity scans. To reduce such mistakes, increase the similarity percent. If you increase the similarity limit on the other hand, you may miss genuinely identical media that happen to differ a lot in sound quality (e.g. in loudness).
For documents and books, only their pure text is examined, ignoring any embedded pictures and formatting (fonts etc). Moreover only the beginning of each book is scrutinized; it is conceivable that books deemed similar may have differences in later chapters; to minimize such false positives i-DeClone first matches books by character count. To enable ebook content searches please download this search and preview free plugin.
|
|
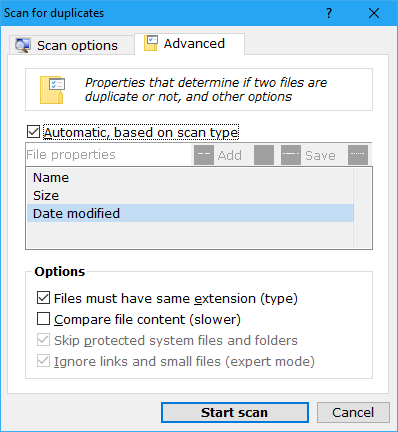
As mentioned, the choice of file type and exact/similar clones (see general scan options property page) determines the file properties used for comparing files. Usually this means Name/Size and Date last modified in case of exact searches. In other words, if 2 files have the same name, byte size and date, they will be considered identical, and if any of these 3 properties doesn't match, then they are considered different. This covers most but not all cases, hence the availability of advanced tweaks.
Here are some reasons why you may need to tweak advanced options:
The last two options (ignore system files and links) are always turned on and are disabled in regular scan mode. To override them (at own risk!) activate expert mode.
![]()
If you switch to expert mode, the Search for selector (item #1 in figure 2) will include a Folders option. Only exact folder duplicates are supported, as similarity is hard to define in this case. Two folders must have the same name and include the same files (in term of names, byte sizes and dates modified). The same holds for any subfolders, they must match exactly all the way down (including all subfolders thereof). Any file difference discovered at any level will render the folders different (i.e. not duplicate). The recursive scanning algorithm is efficient and well designed, so you should avoid changing the default scanning properties, especially those in Advanced property page.
The algorithm used for folder scanning will consolidate duplicate folders to their highest possible level.
For example, say there is a folder C:\TEMP which has a subfolder C:\TEMP\TEST (with several files each), and both folders are identical to another folder structure in E:\OTHER\TEMP (and E:\OTHER\TEMP\TEST), then i-DeClone will mark the only the top folders C:\TEMP and E:\OTHER\TEMP as duplicates, ignoring the subfolders TEST, as these would be cleaned along with their parent folders.
The Size information for each folder will be the total size, including all subfolder contents:


This special scan mode examines whole archives and compares them against other archives and extracted folders, including any subfolders that may exist. The process is usually guided by the main archive name, e.g trying to find a folder called Everything-SDK-3009 that is the extracted version of archive Everything-SDK-3009.zip. If all the contained files match, then the top folder and the archive are declared duplicate. You can either delete the folder or the source compressed file.
|
The complex comparison mode is quite fragile: just a single missing file is enough to call a folder and its archive unequal. There must be a full 1-to-1 correspondence for all contents in terms of name, size and date modified. Also the entire extracted folder must be under a single root folder; if you extract several ZIP files into a single folder, i-DeClone won't find the correspondence.
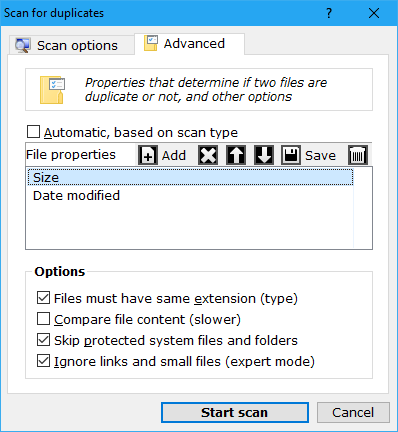
To keep things reasonably fast, i-DeClone does not examine file contents, only names, sizes and dates modified. Moreover, only the first 128 or so contained items are checked (this limit is adjustable using the registry option nZipMaxFiles). This means that the "duplicate" compressed groups reported by i-DeClone are merely hints and not certainties. It is recommended that you double check the results before deleting any files (e.g. select 2 results from a group and press <ALT+2> to compare the folders side by side). To find duplicate renamed folder/zip pairs, untick the Automatic property selection in Advanced page, then remove Plain name property from the list, and move the Names hash property to the top of the list (first) using the up toolbar button (see pic to the right). This is going to make the scan slower but the results will be broader. Note that file names will still need to match inside the zip contents. |

|
| Many people store movies and music albums each in its own separate folder, e.g. the sample folder to the right holds the movie 101 Dalmatians and some ancillary files (a readme and SRT subtitles). But the most important file is the AVI movie file itself. If you run a similarity scan for Movies and this particular Dalmatian movie happens to be kept as a duplicate in another folder as well, what you really want to do is to delete the entire folder, not just the movie file. However the 2 movie folder instances may be slightly different in terms of the secondary files they contain (i.e. they cannot be identified as identical duplicate folders with the above method). The menu command Swap with folders, under Mark duplicates toolbar button, exists for such cases. So if i-DeClone has identified 10 duplicate movie pairs, Swap with folders command will exchange the movies with their parent folders, so you can get rid of the accompanying movie files as well. |

|
| If you are searching for duplicate music, the situation is similar, but now you have more files in each album folder. The pic to the right shows a music album with 5 tracks (MP3), and some album art (JPG). If you search for duplicate Music, and assuming the same album exists in another place, i-DeClone will discover 5 duplicate music pairs that correspond to this one album folder. Swap with folders command will replace these 5 groups with just one duplicate folder group (their container folder) |

|
It is recommended using mark wizard to tick items to be removed before swapping for the parent folders, because you have richer information on the media file level than on the folder level. For example you can examine file sizes and tick on quality. The swapped folders also have some information (their size and number of contained files), so this isn't a compulsory requirement — if Swap with folders command complains just tick one item and it will let you proceed.
|
Swapping for parent folders is useful, but the exchange is risky. There are way too many complications that could lead to a disaster, and altough i-DeClone will protect you from the biggest blunders, some situations are too hard to be automatically detected. What if for example, the Maiden voyage music album in the above example has one extra track in one of the 2 almost-identical folders? Or what if a movie folder actually holds 10 unrelated movies and only one of them is duplicated someplace else?
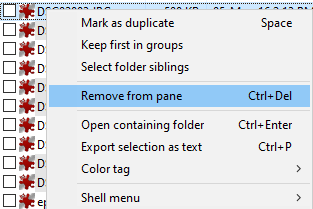
Use swap with parent folders command with caution. There are too many eventualities to consider, and only manual examination of the folder contents can ensure that you are not deleting useful content along with the duplicates. Please select each folder pair with the mouse and press <Ctrl+ENTER> command to open them side by side for inspection. Select any folders that appear to be mistaken and press <Ctrl+DEL> key (or use the right click Remove from pane menu command) to remove them from further processing
|

|
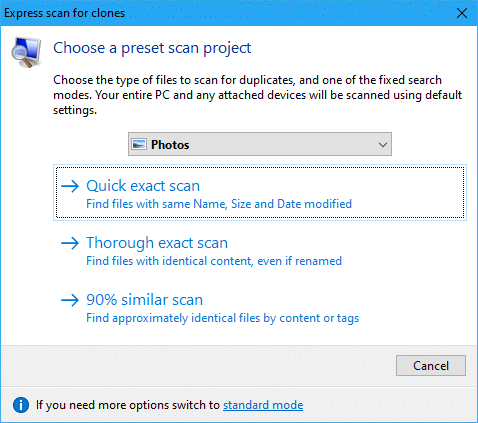
When express mode is active, instead of the detailed scan option dialogs, you get the above simplified version. You can choose the file category (photos, documents, music etc) to search for and one of the preset scans:
Note that express UI simplifies only the search options. You go through the rest of the procedure (mark duplicates and cleanup) as usual. If you need more control over scan options, click switch to standard mode.
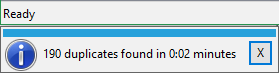
Obtaining exact remaining time estimates is difficult (and largely immaterial — you can't make it go faster), so i-DeClone just shows a progress bar as below. Scan progress is also visible on i-DeClone's windows taskbar button. Only phase 3 (discovery) shows a meaningful progressbar, that gives you an idea about the percent of file comparisons completed.


Click on the little clock button to pause and resume a scan, if you want to give your PC resources a break. At any point you can abort the scan using cancel button.
i-DeClone will not let your PC enter sleep mode while it's searching. It will not show any error messages or ask your input on any subject whatsoever. You can let it work fully unattended. If you happen to fall asleep in the meantime, your PC will follow suit soon after the scan is complete. You can proceed with marking and cleanup in the next morrow :)
Or congratulate yourself on having a spotless, clone-free storage system and carry on with your day :)
|
Sooner or later the scan will be complete and you will be presented with suspected duplicate files, organized in groups with different background colors. Each group can have two or more related files, and you get to choose which one(s) to keep and which you discard. No automated discovery process is perfect, so you are responsible of double-checking the results, lest you should remove good files by mistake.
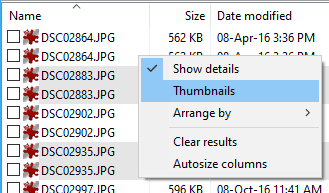
Scan results are presented in a window similar to windows explorer, which most people are familiar with. Usually the pane is set in detailed view mode, but 2 other modes are supported, plain list and thumbnails. Switch among these modes using the background menu of the results pane (right click where there's empty space to access the menu), as seen in the picture to the right. To see results in plain list mode tick off both details and thumbnails from the menu. When no columns show, you can check an item's details via the infotip — just hover the mouse over the item for a little bit to see it. |
|
A special column that appears for all scans is % Similar, which gives the similarity score for items in each duplicate group. If you did an exact search, the value is always 100% (identical), otherwise it is a number between the minimum similarity level you specified (usually 90%) and 100 — a higher score means that items are very similar. If many file properties or/and contents were examined, the similarity score is their average.
|
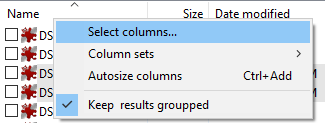
Another special column is Group # showing the group number. Say i-DeClone found 10 groups of 3 duplicate files each, then each group will be numbered from 1 to 10, and this will be shown in the Group column. Click on group column header to arrange items by groups. Organizing by group is very natural so by default i-DeClone always organizes by group, unless you right click on the pane header and tick off Keep results grouped menu option (see pic to the right). When you click on Name or any other header detail to change sort order, it reorganizes items within each group.
Using the header menu (right-click on Name or any other column) you can also add extra file properties that make sense to your review process, using Select columns menu command. Once you select your favorite details use Set as default menu command to ensure they appear in all scan results. |
|
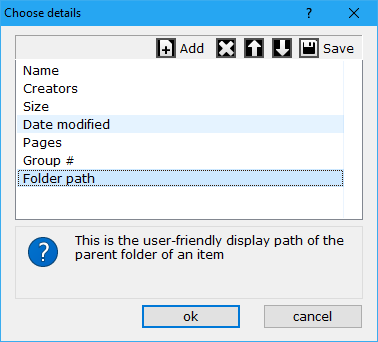
This is another instance of list and toolbar dialog to manage file details for the results. You can add and remove details, move them up/down in the order, or save and reuse sets of columns, all using the correct toolbar button. When you click on Add button, another dialog comes up that helps you choose a new file property.

Finding the correct property among hundreds is tricky, but i-DeClone helps:
The property list shows the type of the property (text, date or number), and a brief explanation of what kind of information the property represents. If you need more information, right click on the property name and use What is this property menu, to find information online.
To conclude the new file property selection, either double click on it, or select it and use OK button to close the dialog.
The previewer pane can be freely moved around the main window. To move it to another edge, grab the preview pane titlebar with the mouse and drag-drop it to another place. As you move around, you get an idea where the pane will be docked if you let go the left mouse button.
You can make the preview pane bigger or smaller using the divider bar. When you place your mouse pointer over the divider bar, it changes its shape to ![]() .
Then you can press the left mouse button to resize it.
.
Then you can press the left mouse button to resize it.
Perhaps a more convenient preview method is pressing both left and right buttons simultaneously on a search result item, which generates a large preview of the item under the mouse cursor. Mouse peek preview isn't as rich as the regular preview pane, but it is handy and doesn't take up any permanent screen space. When you release the mouse buttons, the preview goes away.
i-DeClone shows differences in text documents, using a free text difference tool called WINDIFF, You can also compare complex document types like PDF and DOCX, in terms of their pure text content (ignoring images and formatting). Thus you get a visual idea of how similar the 2 files are (especially if searching for approximate documents). WINDIFF interleaves the text of the 2 files line by line; if lines are identical they show in plain black on white. Lines that differ show in red and yellow. The example below shows 2 books that only have a difference in line #4 (see the line number column to the left)

Using the same menu command you can compare photos and other documents with thumbnail preview images side by side. For movies you see a filmstrip of 4 video thumbnails spaced by 7 seconds. More file types to compare will be added in the near future.
When you search for whole folders, you can compare their contents side by side using this command. If you have xplorer² installed, the 2 selected folders will open in a dual pane window, ready for comparison. Otherwise, two explorer windows will open side by side.
Compare a few items in each duplicate group to make sure they are indeed clones or similar according to your scan options. To remove items that were not correctly categorized, first select them with the mouse or keyboard then press <CTRL+DEL> keys (or right click and use Remove from pane menu command). For similarity searches be particularly careful with items of low % Similar values, close to the cut-off limit (usually 90%), as they are borderline similar and could be a false positive pair.
|
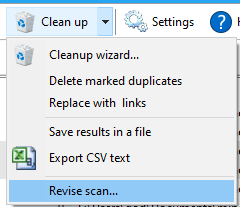
If you feel that the results are not right, or not enough duplicate clones were found, you can always start a new scan — or even better, revise the latest scan project. You will find the revise command under Clean up toolbar button, click on the little arrow to show the menu.
The revision idea is to use the same files already discovered and available in memory with different comparison criteria, so as to match them better. This process is much faster as you won't have to wait to read the entire disc again as in a fresh scan. (acts like a short-term cache). Revision involves the same property sheet seen earlier only now most controls in the first page (Scan options) will be disabled, as you cannot change the type of files searched for or the search locations — but you can tweak the similarity level. You will concentrate on the second page and try out different properties (leave out Name?), ticking or unticking Compare file content option or whatever else makes sense. Then click on Start scan to begin the revision. The old results will be discarded and replaced by those matching your revised scan options — and hopefully will be more to your liking! You can repeat the revision process as many times as you like. Some AI similarity scans by content (photos and documents) are semi-random by nature, so you may repeat (revise) them and find slightly different results each time — even without changing any parameters.
Once you begin deleting or removing duplicate results, revision is no longer possible.
Please begin a new scan instead. |
|
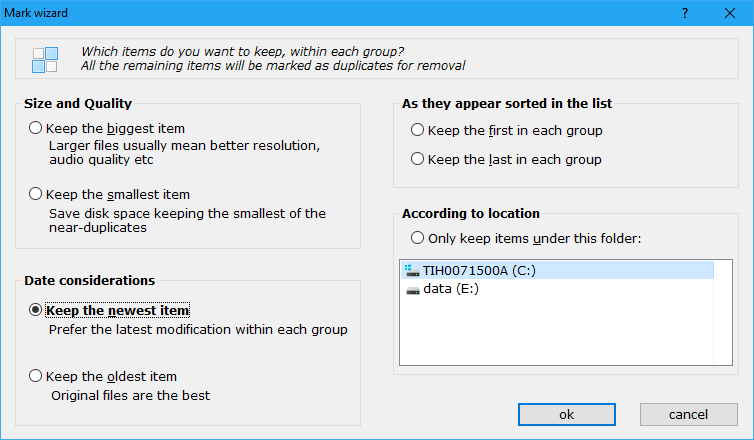
The various options are fairly self-explanatory. You can only choose one option out of those presented, and this will define which item is kept (unticked) in each group. In particular:
|
When a group contains items that are identical in terms of the mark criterion, then the first item in the group will be kept. To avoid such arbitrary choices you can specify additional rules to break up ties.
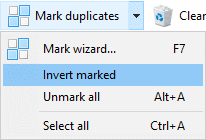
If you do a mistake and pick the "wrong" mark option, you can always run mark wizard again, and it will do all the checkmarks from scratch. You can also use <ALT+A> keyboard shortcut to unmark all items for a fresh start (see Mark button menu). If you want to mark everything, press <CTRL+A> keys to select everything then press SPACE. Mark wizard is for choosing the items that remain, which is the natural choice for groups that include more than 2 duplicate items. If you want to do the opposite and mark the items instead of keeping them, first run the mark wizard as if you are keeping the items, then use Invert marked menu command from mark menu. This trick is most useful when you mark according to folder location. |
|
Mark wizard can often sort out all or most of the duplicate groups. If that's not possible you can use mark wizard as a quick first step, then override the pre-checked states and choose what stays and what goes, manually clearing or ticking checkboxes. To manage possibly thousands of duplicate items, you need efficient use of sorting and filtering, as explained next.
|
Click on the column header to arrange by the corresponding file detail, e.g. Name, Size, Path or whatever else shows up as a file detail. Click on the same column again to reverse the sort direction from bigger to smaller and vice-versa. A little triangle shows the active sort mode (Name in the example above). Usually i-DeClone enforces a major sort by Group so you can see the duplicate files bunched together, but you can right click on the sort header and untick Keep results grouped option seen earlier. Note that the group dark/light background color bands will only show if you are sorting by group.
You can <Shift>+click on a column header to set it as secondary (or tertiary...) sort direction. So you can have a primary sort by Path, then shift-click on Size column and have items that have the same path sorted by size inbetween them. Having items sorted means you can quickly select some of them and either check them or remove them from further consideration. E.g. if you decide that you don't want to deal with files smaller than 100KB, sort by size (after you cancel the auto-grouping mentioned), find and select the first file >= 100KB in size, then press <Shift+Home> to select all smaller files, finally hit <Ctrl+Del> keys (or use Remove from pane context menu command) to remove them from further consideration — they will be safe in their folder and out of your mind. The right-click menu on items contains many useful commands for selecting many items at once as Select folder siblings that selects items from the same folder, and Select same type that selects based on file extension (useful when you scan for similar mixed types e.g. DOC/PDF). There are many uses of such mass-selection, you can mark (check) them all together in one go, remove them from further consideration and so on. |
|

|
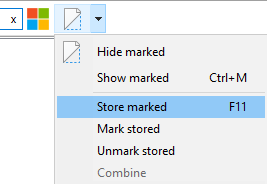
Hide groups button also has a drop-down menu with the commands you can see in the pic to the right. Show marked is a temporary filter that will show just checked items — click on the main Hide marked button to cancel this filter.
The remaining commands implement a "mark clipboard" of sorts. You can store the currently visible checked items and reuse them later, e.g. to add them to a future marked set (Mark stored menu command) or to remove the checkboxes from the stored items later with Unmark stored (in an "invert selection" fashion). Other possible uses of Store marked command include saving the checkmarks against marking mishaps (i.e. undo functionality), remember markings across scans (revised or otherwise) and so on. |
|
No two duplicate screening jobs are equal so it isn't easy to provide commands that automagically "do what you want". However using progressive filtering and your powers of constructive thought, you can achieve complex marking tasks. Note that mark wizard will operate only on files currently showing, ignoring those that are filtered out, so you can apply different mark options to different sets of files (divide and conquer principle).
Here's another use for filtering to mark a set of files:
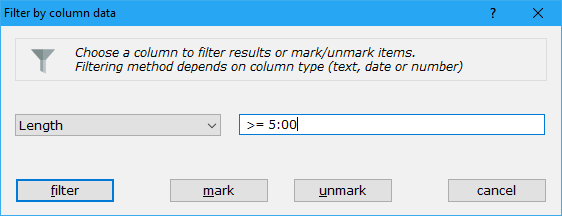
This advanced filtering dialog lets you pick one of the file details curretly showing in the search results window, and then type a matching rule that will select only the files you need. For example, the setup shown in figure 9a above has the Length (song duration) property selected and the rule >=5:00 will match all songs in the results pane with duration greater than 5 minutes 0 seconds — using the standard mathematical >= symbol to express the relationship. To apply the property rule you have 3 executive buttons that can either:
This command can act both as a visual filter and as mark wizard. If used as a filter, it works with whatever items are shown, which may be the result of a previous filtering. So you can apply progressive filters with different file attributes (e.g. first on Length, then on Artist) to home in particular files with great precision.

File properties come in 4 varieties, text, number, dates and enumerations (lists). Except for the latter mode, the input boxes are plain text fields where you can type in what you want to search for. The enumerated mode is for parameters like System.Kind where you must choose one of the predefined options from a drop-down list. As you flick through the property drop down list, the input field changes to match the type of the selected property. Leave the mouse over the input field for a while to see a help tooltip with a quick summary of the filtering syntax.
Rules that accept numbers like Size, can be defined in a variety of ways using common mathematical symbols, e.g. all the next inputs are valid:
| 5 kb | matches files that are exactly 5KB in size |
| >=4096 | search for files at least 4096 bytes large |
| <=6MB | size up to 6 MB |
| 5 .. 10 | size in range from 5 to 10 (note use of .. range operator) |
| ~1GB | size approximately 1GB (10% tolerance) |
| <> 5 | Not equal to 5 |
Many numeric properties can have units, for example searching for file size you can either specify 1024 or 1KB which are equivalent. Audio length can be specified in the form MM:SS and GPS coordinates as 145°3'0" (degrees/minutes/seconds). Note some properties are shown in units different to those that are used to find files, e.g. to search for audio bitrate you must enter the number in bps not kbps (128000 vs 128).
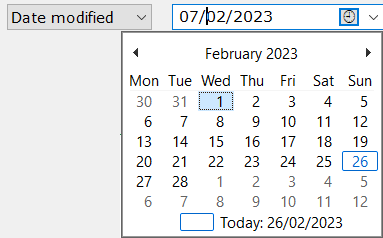
The same mathematical operators can be used for date fields, only instead of simple numbers you specify dates, either full with day/month/year (or m/d/y according to your locale) and time, or a partial date like "December 2022" or just "2022". You can also use text descriptors like yesterday and last year, with the aid of the drop-down menu. Here are some date rule examples:
You can click on the little clock icon to compose a date if you are too bored to type it! |
|
For text rules (e.g. Filename, Path, Artist etc), usually you put one keyword, which can also be a wildcard (*.TXT) or regular expression (TEST[1-9].JPG) — these are automatically identified from their special characters like * or {}. If you put in more than one keyword then all must be present (in any order) for a successful match. If you need to match a whole expression put it "in quotes". For negative keyword match add a leading minus symbol, e.g. THIS -THAT will match documents that contain THIS but not if they also contain THAT. Note that such advanced boolean and regexp rules are only available in expert mode; otherwise all special characters are searched verbatim.
Text file properties are matched if they contain the keyword you type anywhere, e.g. if you search for .MP3 you will match any MP3 filenames. To match what you type exactly (is instead of contains) use a leading equal sign (=TEST)
One possible use of this feature is to mark/unmark pure cloud items, those that are offline (files on demand). These have a distinguishing file attribute called O (for Offline). First make sure that file attribute column is showing for the results (use Choose details command if it's not there), then use the filter dialog to target items with attributes that contain O.

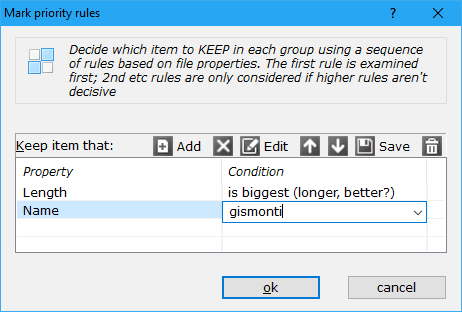
In a way marking with multiple rules is similar to arranging (sorting) results by many columns. We are trying to find the "winner" item in each group of duplicates which is going to be preserved — all the "losers" will be marked for removal. Use [+] Add toolbar button to add file properties that will be used for comparing group items. You can use any file properties that make sense for the type of scan you are working with (but don't use picture dimensions to sort out MP3 songs!). File properties fall into 3 broad categories:
There are toolbar buttons to delete and reorder rules (moving a rule up in the list with Up-arrow button will make it higher priority). The first rule is the most important, examined first, and usually defines the sort order. If the compared items are identical with respect to this rule, the second property is examined, and so on until there is a "winner". Any leftover rules below the deciding row are ignored. If two items are 100% identical after all the rules are considered, then arbitrarily the first item in the group is kept.
Once you have all rules set, click OK button to go ahead and apply them for marking all items for removal except for the "winner".
If an item happens not to have a property (e.g. a missing date), it is instantly considered a "loser" — unless both items don't have said property, in which case the next rule is considered. If you are searching for keywords in text properties there are 3 possibilities:
1. Bit rate is biggest
2. Length is smallest
Note that using byte Size (biggest) would be similar to these 2 rules, but it would select for the Longer item (which would be bigger in size), whereas using multiple rules we can get the finest marking nuances implemented.
If you plan to reuse the same set of marking rules in future projects, use the Save toolbar button and assign them a name. Then you can select the same rules quickly using the Save button drop-down menu.
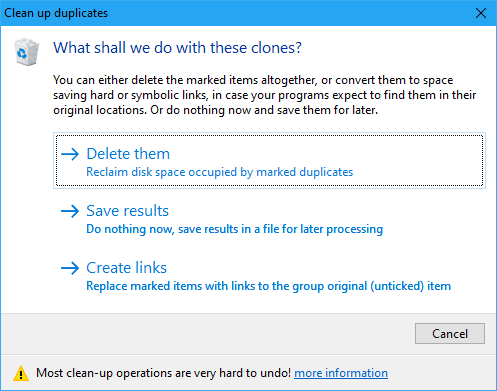
If you click Save results button, you choose not to do anything right now. You save the current scan parameters in a file which you can load later and clean it up. The usual choice is Delete to remove files immediately. In expert mode you have the option to create links instead of deleting clones.
If there are any items filtered out of view, i-DeClone will tell you about it. You can either work with all files, including those hidden, or just clean-up what you can see, whatever you please! However it does insist that at least one item in each group of duplicates is left unticked; this is the original item that remains or the one that all others in the group link against. If any groups have all items ticked for removal, i-DeClone will show them and ask you to untick one or more per group, before you can continue with clean-up. You can use mark wizard or any other method (e.g. manual unticking with the mouse) to leave one item out per group.
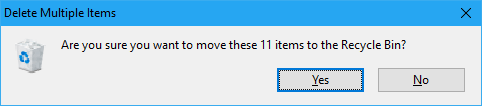
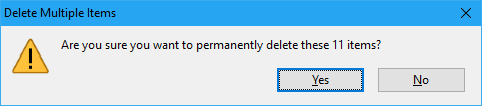
i-DeClone will then show a summary of the clean-up, which you can accept or cancel. Please study it carefully because it is your last chance to abort before unrecoverable changes begin. Once going, clean-up operations show a progress dialog, which you can pause momentarily or cancel altogether. If any problems are encountered, i-DeClone will tell you about then and ask if you want to continue or abort the clean-up. In the end, all clones are removed from view, leaving behind the unmarked "originals", plus any clones that encountered problems and couldn't be removed. At this point all is said and done, and you can either quit the program or start a fresh scan.
Only local filesystem files and those in USB-connected hard disks are moved to the recycle bin. Other locations are deleted directly and are harder to recover (using backups or undelete tools). Files that cannot be recycled include:
| Files that are recycled are only half-deleted. They still occupy disk space. Once you are sure you won't change your mind, right click on any recycle bin icon, e.g. the one on your PC Desktop, and use empty recycle bin command from the menu. Then the clones will be gone for good |
|
There are 2 types of links, each with its own limitations and oddities. Linking is supported for local NTFS regular files only (sorry, no FAT32). If your scan was for approximate files linking isn't possible either — only for truly identical files. In general, if you can afford to, your first clean-up choice should be deleting instead of linking.
i-DeClone will try to create a hard link first, if the situation allows it, as they are more reliable. Failing that it will try a symbolic link. The actual action performed is logged.
If you are working with duplicate folders, i-DeClone will replace one of the folders with a folder junction, that also works as a transparent link to the identical folder contents.
|
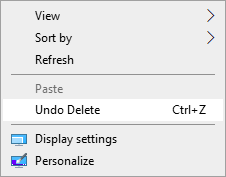
Undoing clone deletions is often possible if they ended up in the recycle bin. The trick is that you don't use i-DeClone but your windows desktop or windows explorer! — like a regular file deletion. Immediately after the clean-up is finished or interrupted, right click on your windows desktop and use Undo delete menu command. Your files will be placed in their original locations. i-DeClone may still think the files were deleted, but you can check with your file manager that they were indeed restored.
If you cannot see the undo command in windows explorer menu, then your files were deleted directly and cannot be recovered easily. If you act quickly you may be able to get important files back using one of the undelete tools available, or using file backups. This risk is inherent in all file deletions, and is unrelated to i-DeClone.
If you opted for linking clones, unfortunately there is no undo possible. Theoretically it is possible to use the log file created (see below) and painstakingly reverse all linking commands. |
|
FILES HANDLED ----
C:\Temp\NewCopy.txt
	[S] C:\Temp\NewFile.txt
	[S] C:\Temp\sub\NewFile.txt
C:\Temp\search.ico
	[H] C:\Temp\sub\search.ico
The first file in each group is the main target, which remains intact, and immediately below it follow files that were replaced with [H]ard or [S]ymbolic links to the main file of each group (other possibilities are folder [J]unctions and plain shortcut [L]NK files.) Linked files are indented to the right with tabs. Items with errors are marked with [!] exclamation mark and the error details follow the file path.
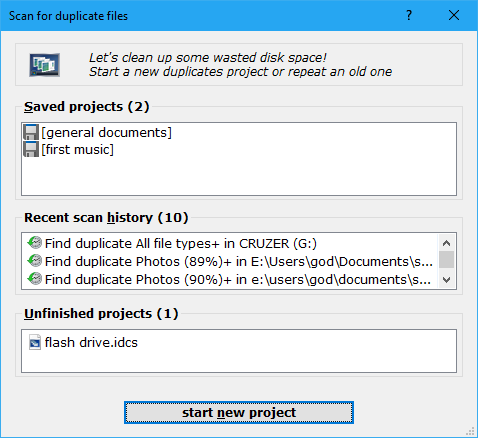
The project dialog has 3 lists of projects:
Each project group box has a count of available items (e.g. Unfinished projects (1) in figure 11). Use the scroll bar/arrows to bring hidden items in view, then click on the desired item to activate it. When you repeat a previous scan for clones (either saved or from recent history), you get to change the parameters if you want to run a slightly revised scan, or just click start scan button to repeat the old search verbatim.
If you no longer need an old project item, right click on it and use Delete item from the menu — or press <DEL> key to remove the selected list item.
If you start a new scan project without first cleaning up the previous duplicates found, i-DeClone will ask you if you want to save the results for later. If you respond with Yes, then a save results IDCS file will be created, and will be available as an unfinished project in project selection dialog.
You can keep such unfinished project files wherever you like, but you could create a new folder for them somewhere (using your file manager) to keep them all together. The latest 5 unfinished projects are easily available through the project selection dialog; if you have more, you can double-click on them and they will open in i-DeClone, the registered program for IDCS files.
Everything you see in the window will be stored in the file, including groups, columns and any checkboxes. Note that (any) color tag information is not saved with the results. Color tags are impermanent and survive only for the duration of a single program run.
Once you clean up some of the reloaded duplicate files, i-DeClone considers the matter dealt with and will remove the IDCS file from unfinished projects list. Note the IDCS file itself is not deleted automatically — you need to remove these with your file manager.
Think of the following scenario: your hard disk is clean, but you want to add some files from an external HD or a network drive. Obviously you don't want to duplicate content that is already present in your local HD. You could do a fresh scan on your local E:\ and the external (say D:\ drive) combined, but that's going to take a long time. Your local E:\ drive is already checked for duplicates, you only need to check its files against the external storage — not within E:\ itself.
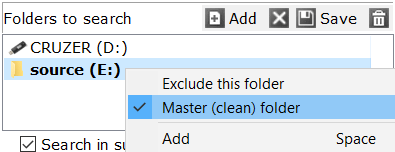
For this purpose, when you specify the folders to search in the scan options dialog, right click on E:\ folder and pick Master (clean) folder from the menu. A folder that's declared master is only checked against other folders, exactly what we want in this scenario. Thus i-DeClone will only find duplicates residing in D:\ as quickly as possible.
|
Note that this isn't the same as checking folder (drive) D:\ on its own; it is checked for duplicates both within itself and against the master folder E:\. For cleanup it makes sense to keep all items under the master folder, selecting E:\ in mark wizard (select it with "Only keep items under this folder").
Master folders are shown in bold in Folders to search box. To cancel a master folder, right click on it and use the same menu command, which acts as a toggle. It is possible to have more than one master folder for a scan.
Master folder contents are read for the scan, but files belonging to a master folder are not compared against each other — only with files residing in other top level search folders — hence the saving in processing time.
|
|
Click on Settings toolbar button (or press <F12> key) to modify various program options. Options are organized by category and you can see what each option does at the bottom of the settings dialog as you choose each option. Click on Defaults button to reset all settings to "factory" values.
i-DeClone normally saves its settings in the registry, but you can have it in a portable mode too, keeping a file called DECLONE.INI next to the program (say if you use it off a USB stick). Use Save settings option (under General category) to define where settings are saved — or if they are saved at all.
If you are not familiar with property controls, they are quite straightforward to use as follows:
Here is the complete list of program settings, but note that some of them are not available unless you enable expert mode. Most options are easy to understand, with the assistance of their explanations in the dialog (see the description area [8]).
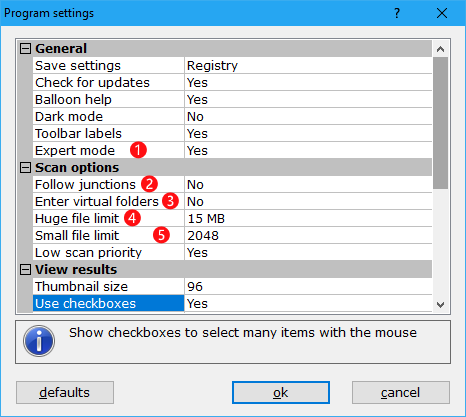
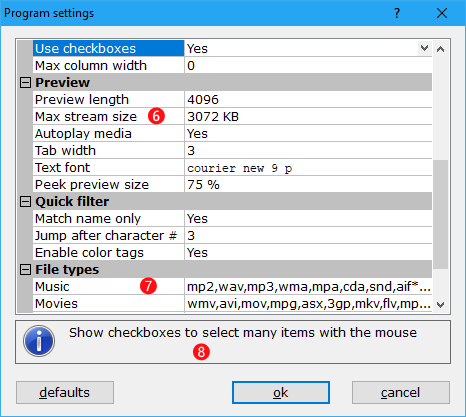
Here are clarifications about some of the more tricky options:
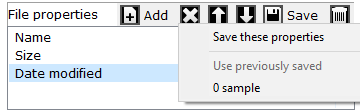
All toolbar buttons have equivalent keyboard shortcuts, as seen in the toolbar popup help text. e.g. <Del> key would delete the selected list item. You can also right click on list items and manipulate them with a context menu (it offers the same commands as the toolbar).
Double click on an empty space or use Add button to add a new list item. The dialog that ensues depends on the list type, e.g. for folders to scan it will be the standard windows Browse for folder dialog.
Click on Save button to access a menu that can save the current list with a descriptive name of your choice (something that will help you remember what the list is about). Once saved, the list will be available to restore again using the Save button menu. The latest item saved appears first in the menu, under Previously saved ghost item.
To overwrite a previously saved list, modify its contents then save it with the same name. The old definition will be replaced with the new one, and the item will be moved to the top of Save menu.
The procedure to remove a saved item from the menu is a bit quirky: right click (inside the menu!) over the saved item you want removed and use Remove command from the second menu (!). Quite an odd method to delete items arguably, but now you know how to do it :)
Some advanced program tweaks are possible through registry editing (or editing the INI settings file). You must first fully quit i-DeClone pressing <Alt+X> keys, then fire up the registry editor typing REGEDIT.EXE in Start > Run dialog (<Win+R> key). Then locate the main registry key HKCU\Software\ZabaraKatranemia Plc\DeClone and change values documented below. It goes without saying that if you are not familiar with registry editing you should stop right here!
EDITING THE REGISTRY CAN RENDER YOUR COMPUTER UNUSABLE.
Unless you are 100% certain you know what you are doing, you are advised not to modify it in any way.
Names that start with "bin" imply values that are made up as the sum of individual bits. Please sum up all the numbers representing the options you want and set this total number to the value. Don't modify any bits that are not documented in the table. An x number prefix indicates hexadecimal (x100 = 256)
| Key | Value | Data | Explanation |
| General | binFlags | x100 | enable searching in very deep folders (overall path >260 letters ) |
| x4000 | always scan MTP devices like phones | ||
| x80000 | write DC_CLEANUPxx.LOG file in %TEMP% folder (includes cleanup actions and any errors) | ||
| x1000000 | don't use explorer thumbnail cache | ||
| binMoreOptions | 64 | disable window alpha-shading when a dialog shows up | |
| x100 | favor windows 10 automatic resampler for music fingerprints | ||
| x800 | prefer LNK shortcuts, then try hard and symbolic links | ||
| binSearchFlags | x2000 | disables automatic wildcard handling for advanced filtering, search exactly what you type | |
| msDateTolerance | ms | millisecond tolerance for approximate file date comparisons (default 1000ms *2 = 2.0 second considered identical date, to catch NTFS/FAT32 date differences) | |
| nHours1PCdiff | hours | How many hours correspond to 1% difference in file dates. Default is 240h which means that files 10 days apart in date modified are considered 1% apart; 2400 hours (=100 days) corresponds to 10% distance and so on. | |
| bin1OffNotify | Set this to 0 to reset all the "don't show this again" type of messages and see them all over again | ||
| rgbViewBgcol | xBBGGRR | background color for search results, -1 for the default windows color | |
| szTextViewerPath | path | Full path for editor you want to associate with <F3> command to view text files (if xplorer² is installed this defaults to editor², else notepad is used) | |
| szFileCountRule | wildcard | Comma separated list of wildcards for Stock.FileCount property. E.g. *.txt,*.log would count items with txt and log extensions. The default value * counts all the direct subitems in a folder. | |
| nPeekTextWidth | pixels | Pixel width for peek preview window used for text documents (pictures preview according to their dimensions). | |
| nTextSample | bytes | Text characters used for fuzzy document comparison, from the beginning of the file. Default is 48KB of text | |
| nFileSample | bytes | Optional number of bytes to examine from the beginning of each file, if not comparing explicitly by content. Default value is 0, which means no contents are compared, only size and date modified. | |
| msSongStart | msec | Approximate music comparison by content samples the starting 15 seconds of each audio file. This parameter allows you to vary the duration examined. | |
| msVideoSkip | msec | Many movies start with the same "20th century fox" introduction, so i-DeClone skips the first 50 seconds to where the "real" movie starts. If you want to skip more, tweak this parameter | |
| n1stColBoost | percent | The first property listed in Advanced scan page is very important and is always set to 95% or higher, regardless of the similarity level of the scan. This registry tweak allows you to change the default, but if you lower it too much the scan times will get very long. You may want to consider increasing it though to e.g. 97% if you get many false positives | |
| nFastFilterCnt | items | Filtering using all file properties may take a long time, when there are many items shown. This tweak sets the limit of items (duplicates) in the pane above which only fast properties are used for filtering, e.g. Name or Path, but not music Genre — or anything similar that takes too long to extract. Set it to 0 to disable the protective feature. | |
| nLineSpacing100 | percent | increase duplicate results line spacing in details mode. Acceptable values are from 100 (normal) to 200 (double spacing). This is achieved by vertically stretching the file icons, so it looks a bit funny | |
| nZipMaxFiles | items | How many files to examine within compressed archives before calling them "duplicate". Increasing this value will increase the confidence of the comparison, but it will take longer to examine more content. | |
| view_e900 | nMaxListColumnWidth | pixels | Maximum pixel width of list view mode. Set it to 0 for unrestricted size |
| binMiscOptions | x800000 | Don't | |
| x100 | Highlight the quick filter keyword in matching item details (columns) | ||
| QuickView | binMiscOptions | 4 | Preview in a background thread for responsiveness |
| 8 | Use internal text viewer for all text content | ||
| 256 | Don't animate peek preview window | ||
| 2048 | Keep external previewers alive for faster document loading | ||
| Tag colors | name | xRGB | If you want to add more tagging colors, create this registry key and add the colors as a list (e.g. RED 0x0000FF, GREEN 0x00FF00 etc) |
i-DeClone is a "try before you buy" application. You can download and install it, then use it for free at full capacity for a limited time period. This way you can tell if it is the right tool for you before buying it. The longer you take to evaluate the more nags it will throw at you, including this nag dialog when you start it:
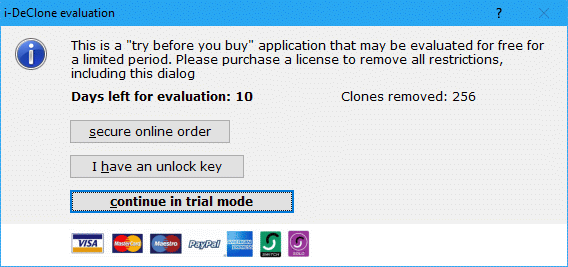
Click on Continue in trial mode to proceed. Eventually after a period of evaluation at full capacity, it will switch to restricted mode. After that the search engine will barely work: it will only show the first few search results. At this point really you should make up your mind, whether to purchase or uninstall.
i-DeClone is licensed per user. If you are the only user and have 2 computers, you only need one license key. But you must add a seat for each extra user. Your purchase will entitle you to free upgrades and support for one year (at minimum, perhaps longer). Click on the Secure online order button (see figure 14 above) to start the ordering process. All the usual payment methods are available.
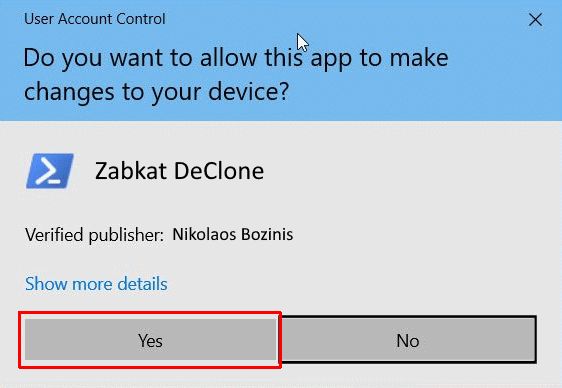
Once you receive your key by email, click on I have an unlock key and start the license manager in full administrator mode. If you see any UAC elevation prompt click Yes to run i-DeClone elevated:
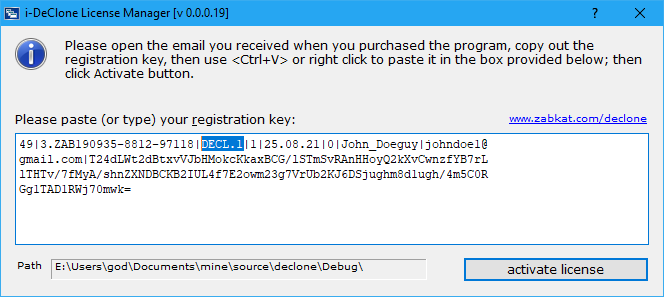
Open the email with the unlock key, and copy/paste the long funny looking key (all of it, usually 3-4 lines of text) and paste it in the license manager window, then click on Activate license button and you should be able to activate your i-DeClone. If all goes well, you can restart i-DeClone and enjoy the program in full power.
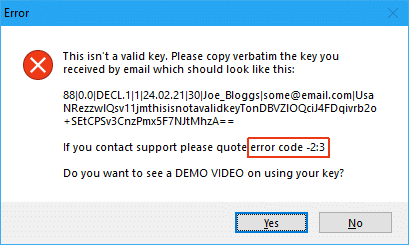
If there's something wrong with your key, i-DeClone will tell you about it with an error message, which will include a brief explanation of the problem and a numeric error code (see the pic to the right). Here are the most frequent error codes and their remedies:
|
|
Software details
i-DeClone runs on windows Vista or later (7/8/10/11 etc). The installer includes both 32 and 64 bit versions and installs the most suitable for your Windows system.
Customer support
If there is something that you cannot understand using this help file and the demo videos (there are a few under the HELP toolbar button), please contact email support. If you suspect any bugs (e.g. the program crashes) please use the Reliability command from the toolbar help drop-down menu, adding as much information as possible to help us reproduce the problem. You can also ask questions in the forum.
|
Command line arguments You can edit the shortcut icon properties (what you click to start the program, see pic) to add command line switches and arguments. COMMAND LINE OPTIONS
|

|
A folder name can be passed to start the search where you want. Another way to pick the starting folder is to right click on it and pick i-DeClone Duplicates command from the context menu.
Alternatively, a saved scan results file (*.IDCS) can be passed as the command line argument to start dealing with an old search.
Keyboard shortcuts
Many keyboard shortcuts appear next to the (context) menu commands, e.g. right click on some item or at the background of the file list view. Toolbar buttons also have shortcut keys as indicated in the tooltip, e.g. START SCAN (CTRL+F), where the shortcut key CTRL+F is shown in brackets.
Here are some other available commands (similar to xplorer²)
| Key | Function |
| Ctrl+A | Select all |
| Alt+A | Unmark all |
| Num * | Invert selection |
| SpaceBar | Toggle selected files' checkbox on/off |
| Alt+Down | Jump to next group (UP for previous) |
| Ctrl+Shift+E | Toggle expert mode on/off |
| Ctrl+C | Copy |
| Ctrl+X | Cut |
| Alt+Ret | Properties |
| Ctrl+Ret | Open selected item's container folder |
| Del | Delete selection (real file delete) |
| Ctrl+Del | Remove selection from pane (files not deleted) |
| Alt+C | Copy selected path names |
| Ctrl+P | Copy selected information (all columns and details) |
| Ctrl+Plus | Autosize columns |
| Ctrl+Q | Toggle the preview pane on/off |
| Alt+Q | Quick popup (peek) preview of the focused item (press any key to dismiss the preview window) |
| Alt+2 | Preview two items side-by-side for comparison |
| Ctrl+J | Start expert local search mode where only items present (drag-dropped) in the window are checked. |
| F1 | Displays this help file |
| F12 | Program settings |
| F2 | Rename |
| F3 | View selected file as text |
| F5 | Refresh view to clear deleted items |
| Ctrl+F | Start new scan |
| Ctrl+U | Show all files (if anything is filtered out) |
| Ctrl+wheel | Change thumbnail size using the mousewheel |
To select multiple items use the middle mouse button. This toggles the selection status without affecting the selection of other items. Another solution is to hold down <Ctrl> key while selecting with the left mouse button.
Press both left and right mouse buttons together to see a popup draft preview of the item under the mouse cursor. Let go of the mouse buttons and the preview window will disappear. The size of the preview window is controlled via program options.